Upon my retirement in 2023, I have built a woodworking shop in my backyard. The shop is 16×37 feet in size (592 square feet) and sits on a floating concrete pad. This page outlines the structure as it went up including a lot of details such as how much time each task consumed.
Design
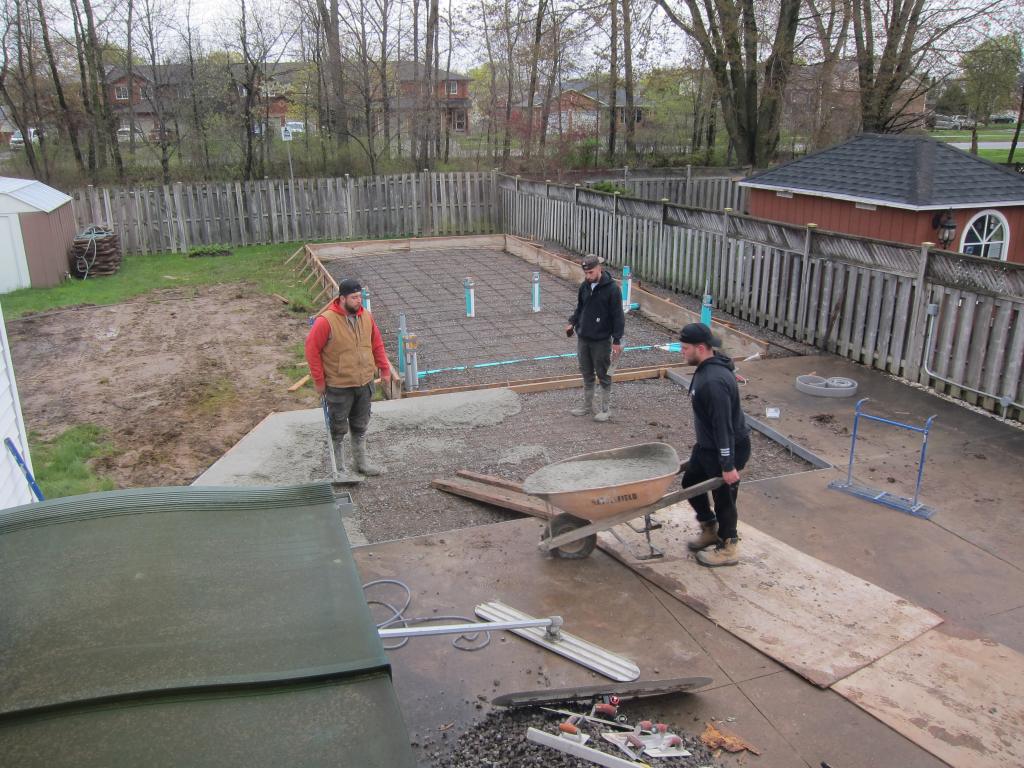
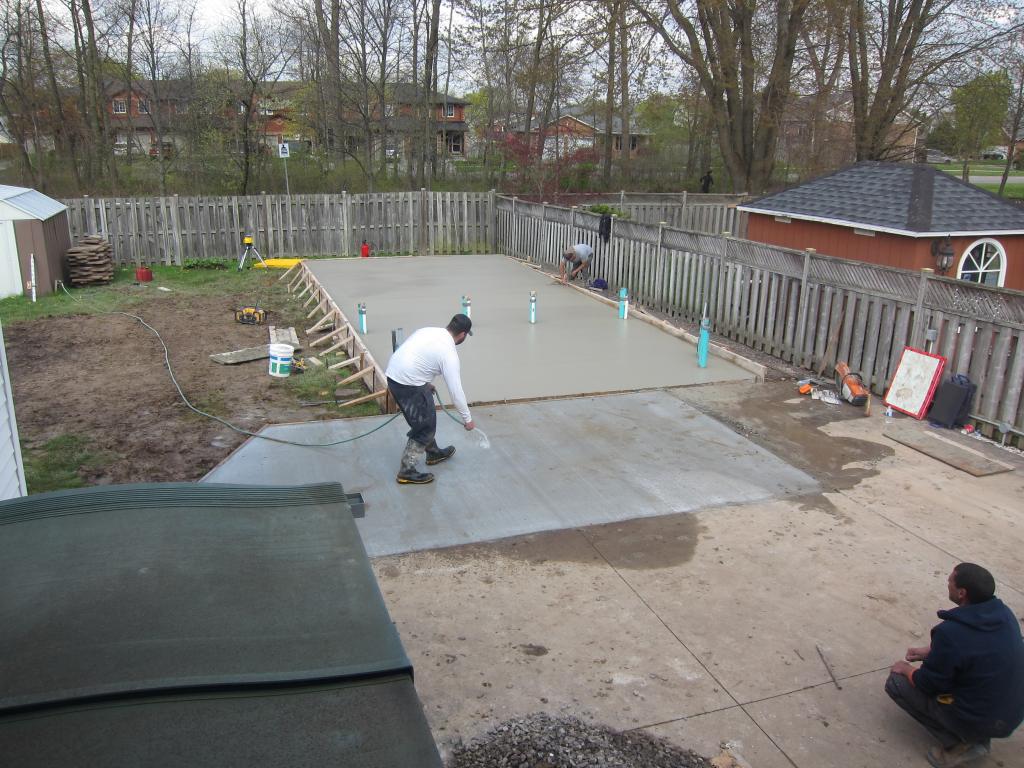
The shop is 16×37 feet in size sits on a floating concrete pad with thickened walls (required per building code). City regulations allow a building of up to 770 square feet however if kept under 592 square feet a simple pad can be used without the need for an engineer’s certificate. Although building code calls for a 3″ thick pad, my pad is 5″ thick with rebar in both directions 18″ OC.
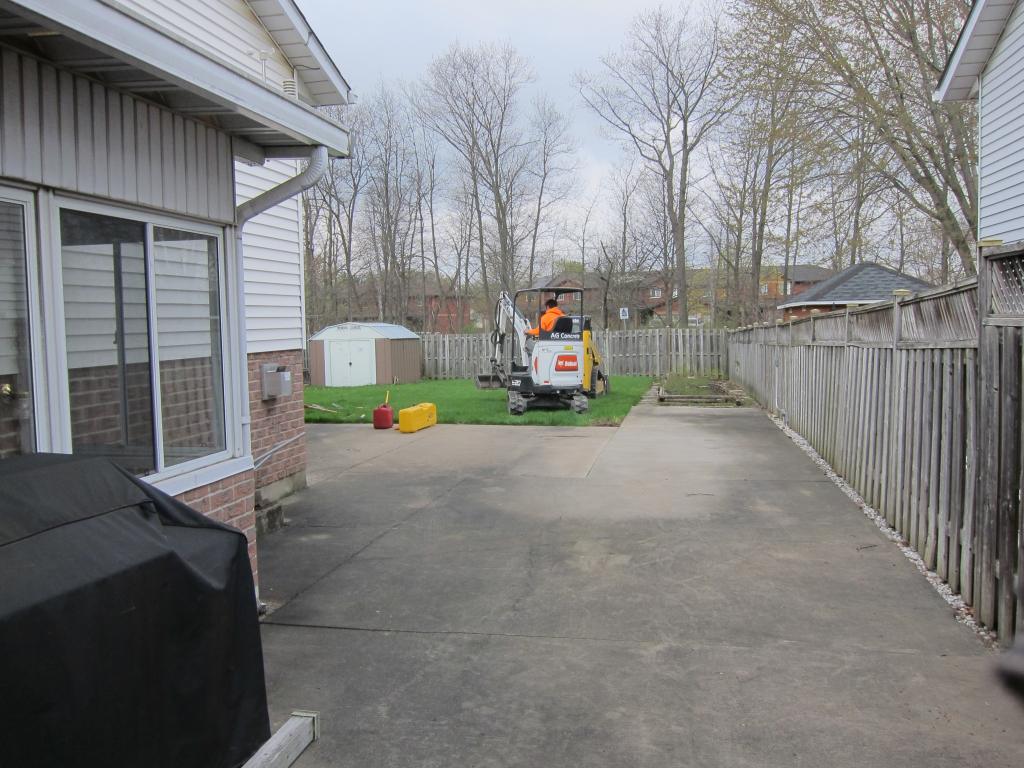
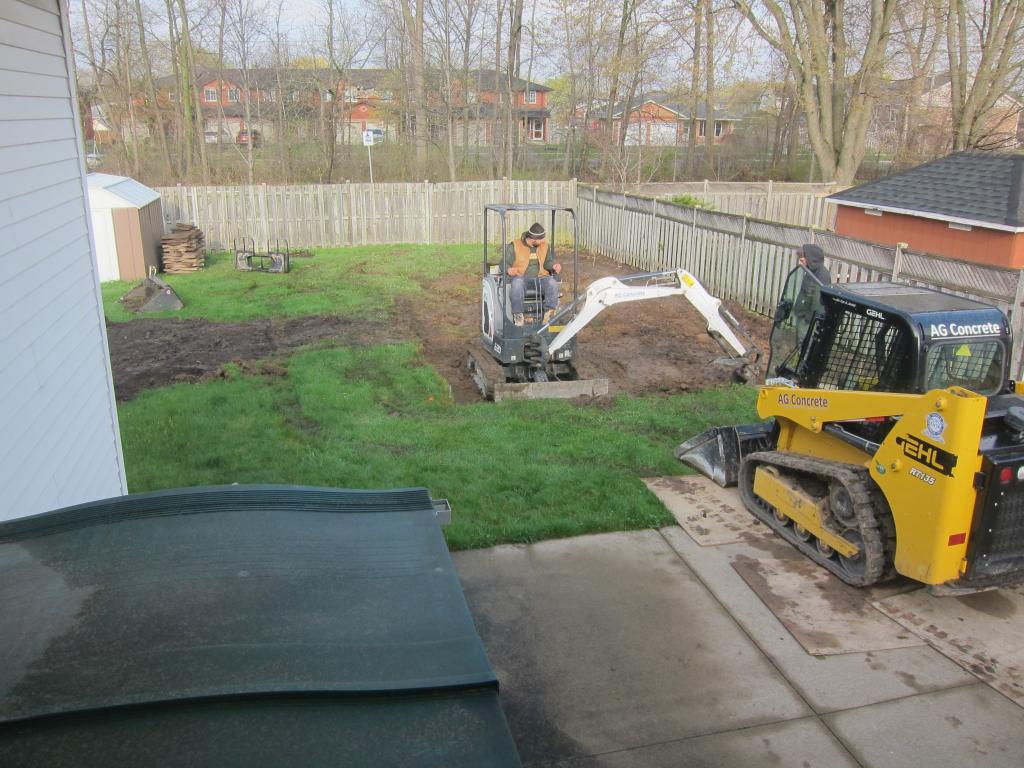
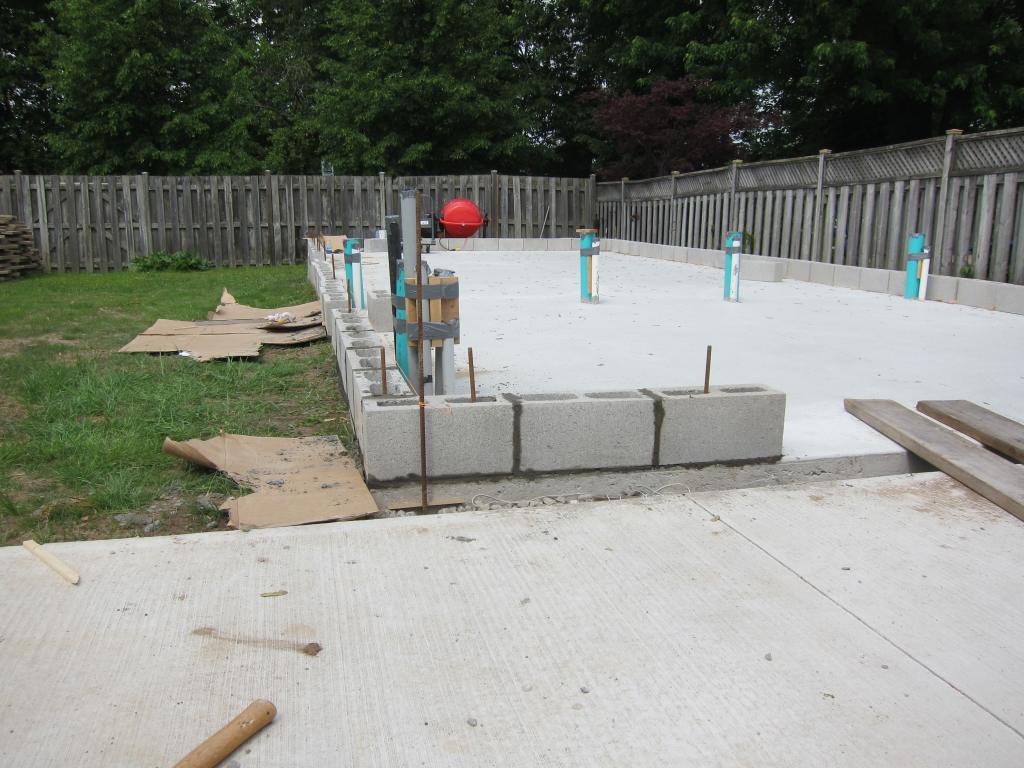
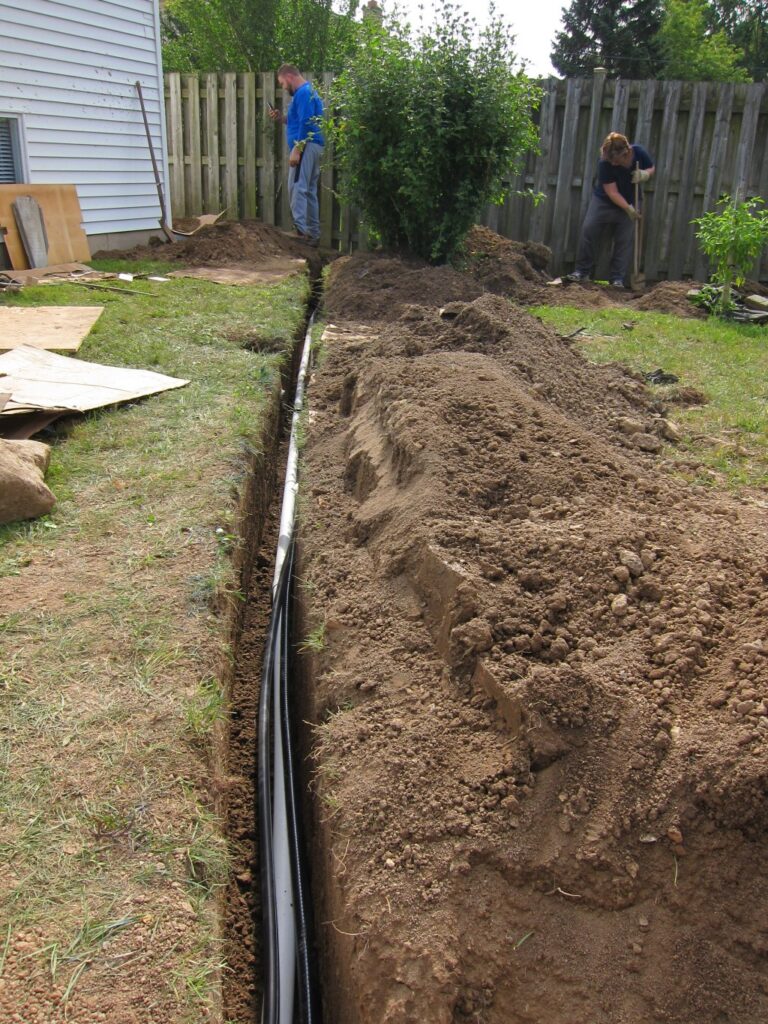
Several 4″ and 2″ PVC lines are buried into the concrete pad for dust collection and services. In particular, the middle of the pad features a 4″ PVC pipe with an opening at both side walls and two openings protruding from the pad on either side of the place where a cabinet saw will eventually sit. This will mean there won’t be any overhead lines around the saw so sheet stock can be handled easily. Next, a single layer of 8″ high 6″ wide concrete block was be laid around the perimeter of the pad (again, required by code as the siding on the exterior walls must be 8″ away from the grade).
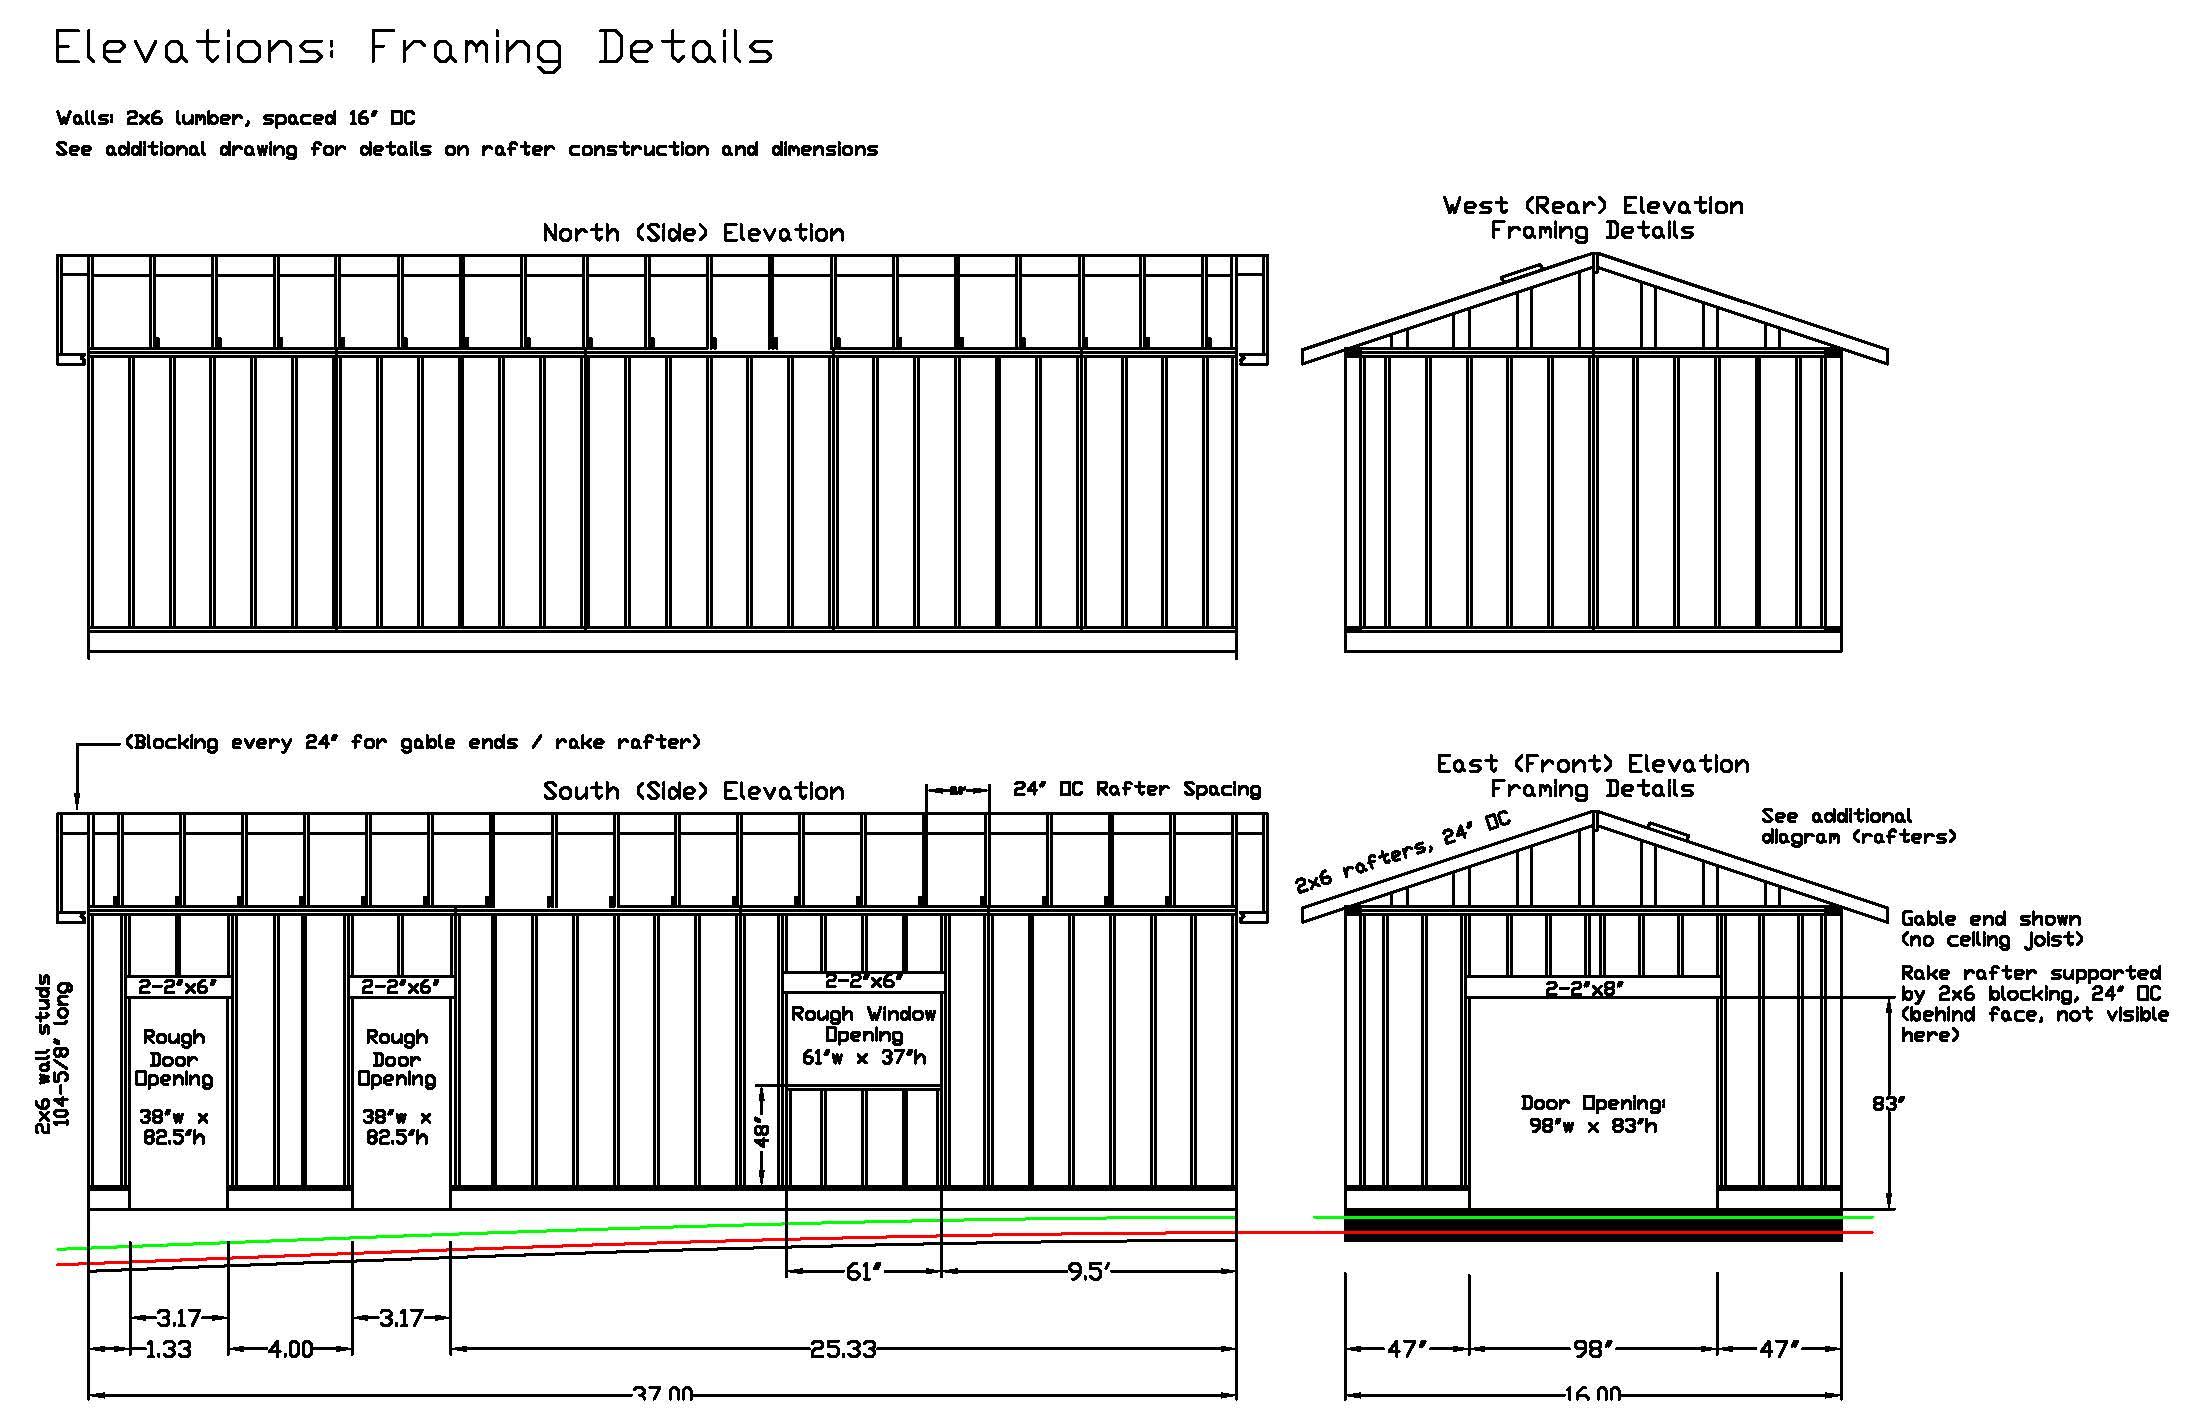
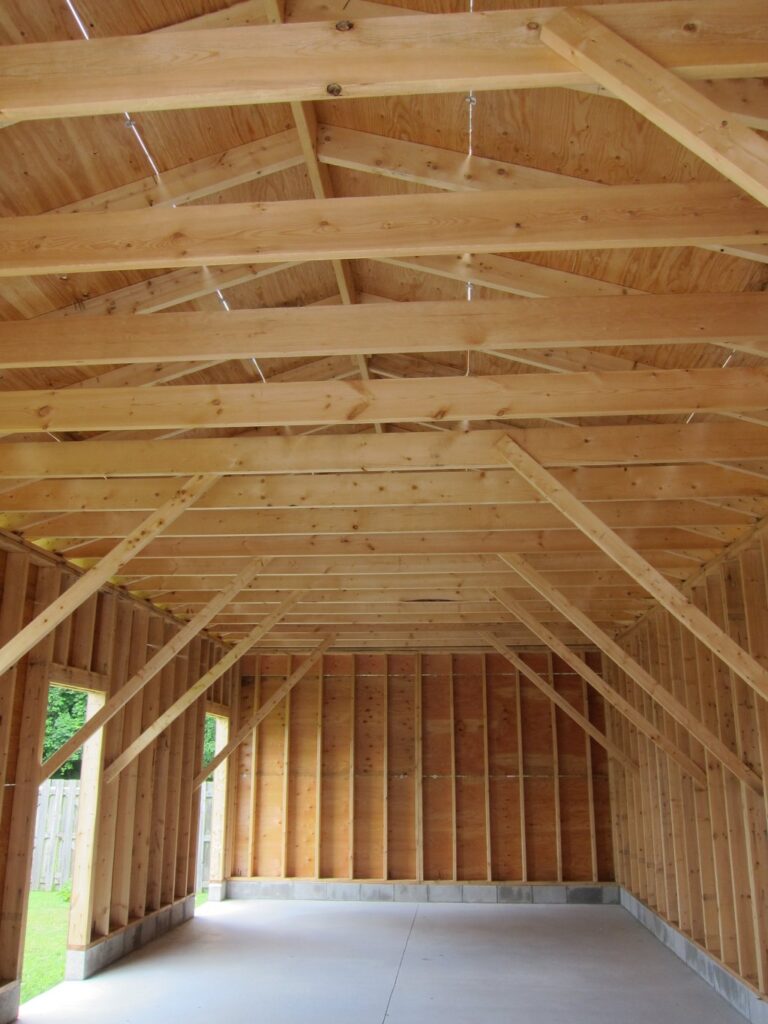
Framing is 2×6 walls with an interior height just under ten feet to allow 4×8 boards to be swung around inside with ease. And finally a rafter roof: yes, rafters are more work however the lead time on prebuilt trusses was ridiculous (post-pandemic, five weeks for a quote and three months to build) not to mention expensive. So long as the shop is built with a gable roof under 13’1″ maximum height, simple rafters can be used.
Once the shell was built, ACWU-90 cable was run in a trench and add a 100A power subpanel to power all of the equipment. The walls can then be insulated and a heat-pump installed to heat and cool the shop. The heat pump is a good option here as there really isn’t enough room beside the house for the required separate trench for a gas line. This also explains why 2×6 walls were chosen (the extra insulation afforded by the thicker walls, R-20 instead of R-12 for 2×4 walls, will pay for itself in about seven years at current rates, and probably less as energy prices rise.
The AutoCad drawings of the building which were needed for the permit submission …
Concrete and Pad Work:
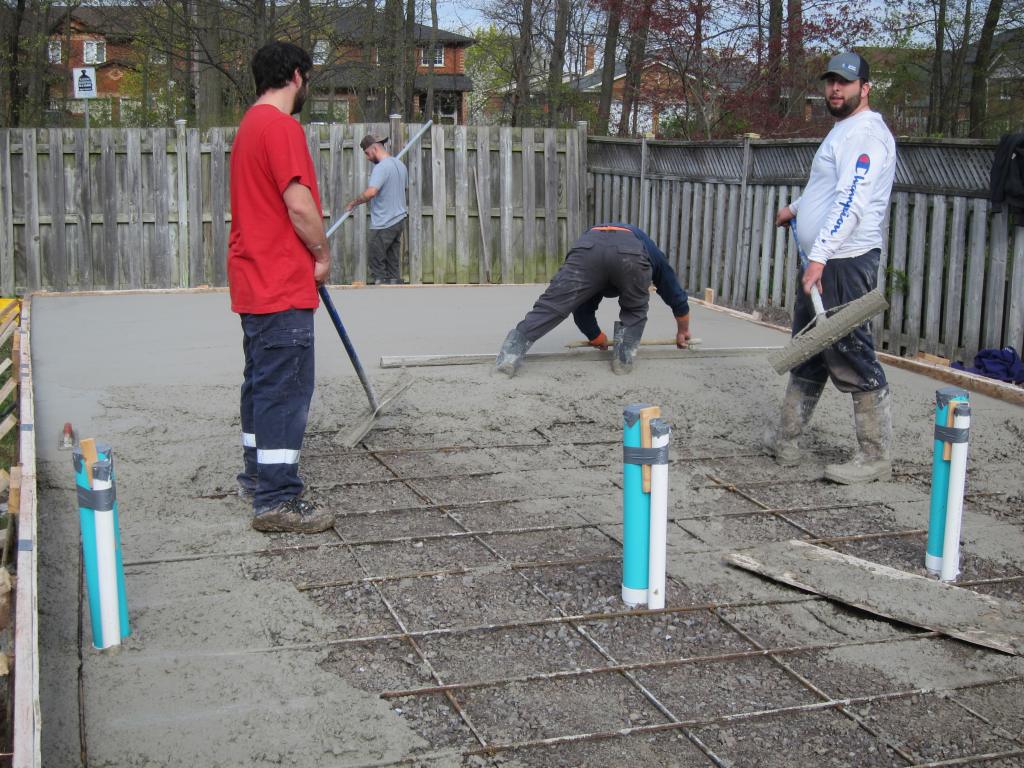
Cost of the just the pad was $20K. It would be temping to have done it ourselves, especially with a daughter who is a professional engineer with a mining company and can get concrete at a discount, however a pad like this must be poured in one shot (meaning a crew). With no experience with concrete whatsoever and lacking the help of seven close friends with strong backs, we opted to find a contractor we could work with. Quotes ranged up to $45K (that was a joke, I swear, from a construction company that said they did ‘small jobs’) but $20K seemed to be the going price. This was the single largest expenditure for the project.
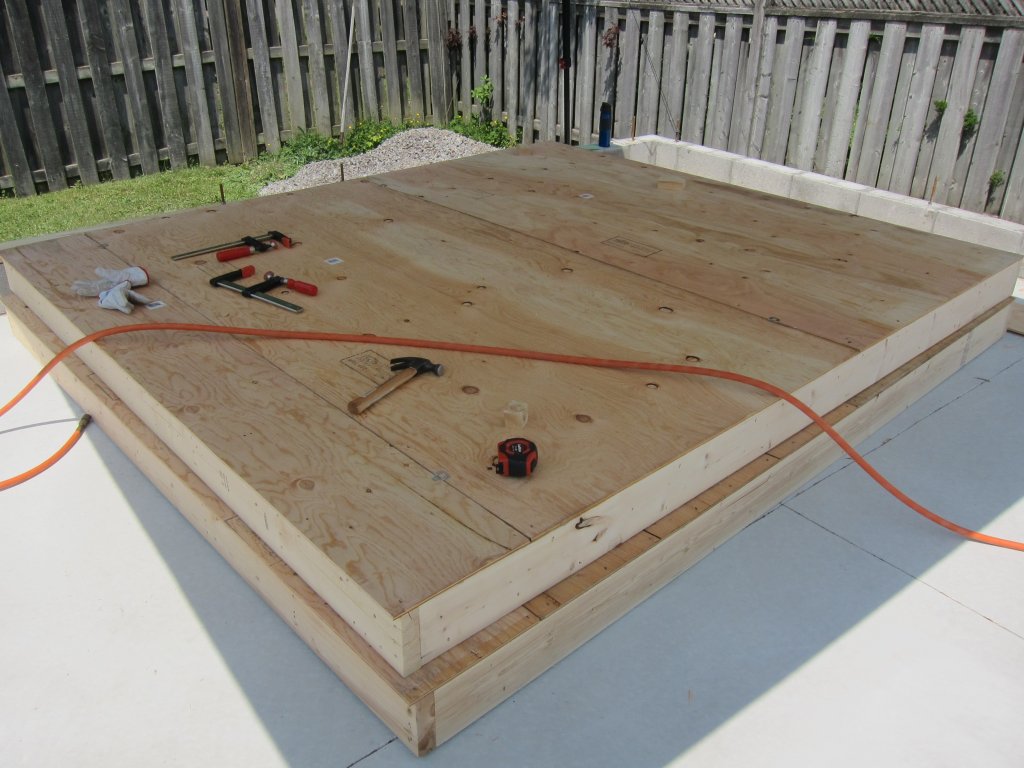
The pad was poured with thickened edges as required by code and with a thickness of 5″. Fifteen cubic meters of concrete went into the pad. Re-bar at 18″ OC was embedded into the pad which consists of 32MPa concrete with fiber additive to reduce cracking. Months later, only one small crack appeared on top of the embedded 4″ PVC pipe for duct collection (which I was warned about, but I really wanted buried ducting).
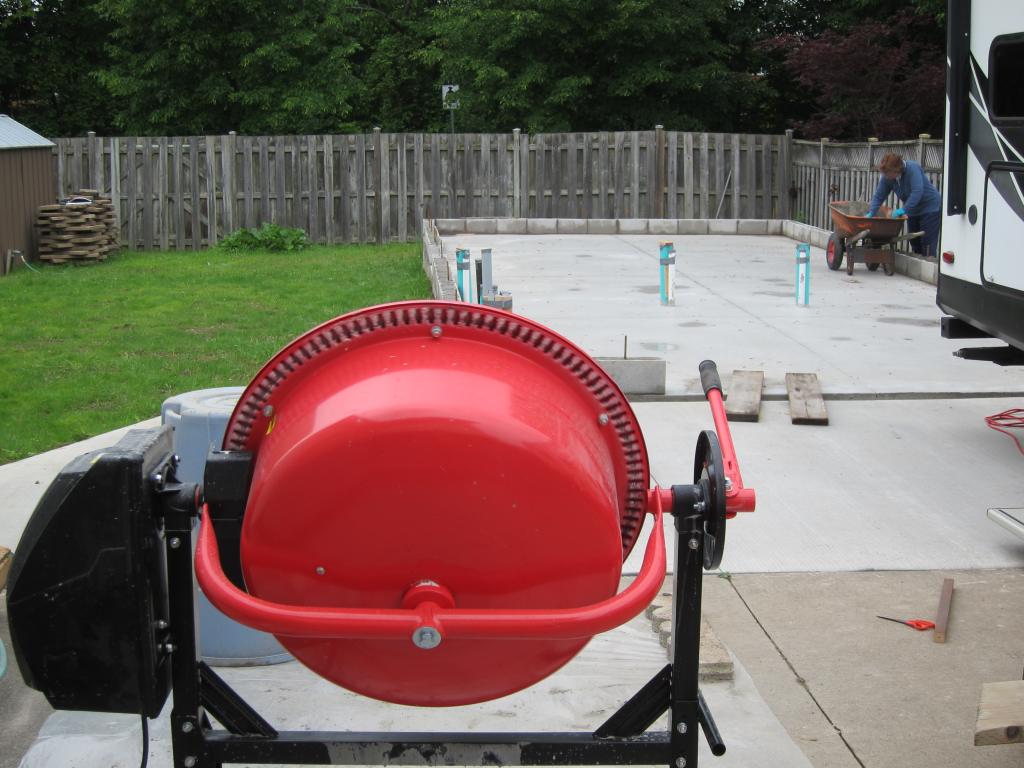
We then laid concrete blocks around the perimeter since the building code requires that walls be no closer that 8″ to the finished grade. We got a quote for $1700 to install the blocks ($600 to install alone, plus $1000 for materials, then tax) which seemed excessive – we went to Canal Block in Port Colborne to purchase 70 blocks at $4 each and used six bags of type-S mortar to affix them to the perimeter. Included in our costs was a cement mixer, needed not only for the mortar to put the blocks down but also the eighteen bags of concrete needed to fill the center of the blocks (the city building department required this and noted it on the plans).
Anchor rods were buried into the large pad and protrude through the blocks for the sill plate to be bolted onto.
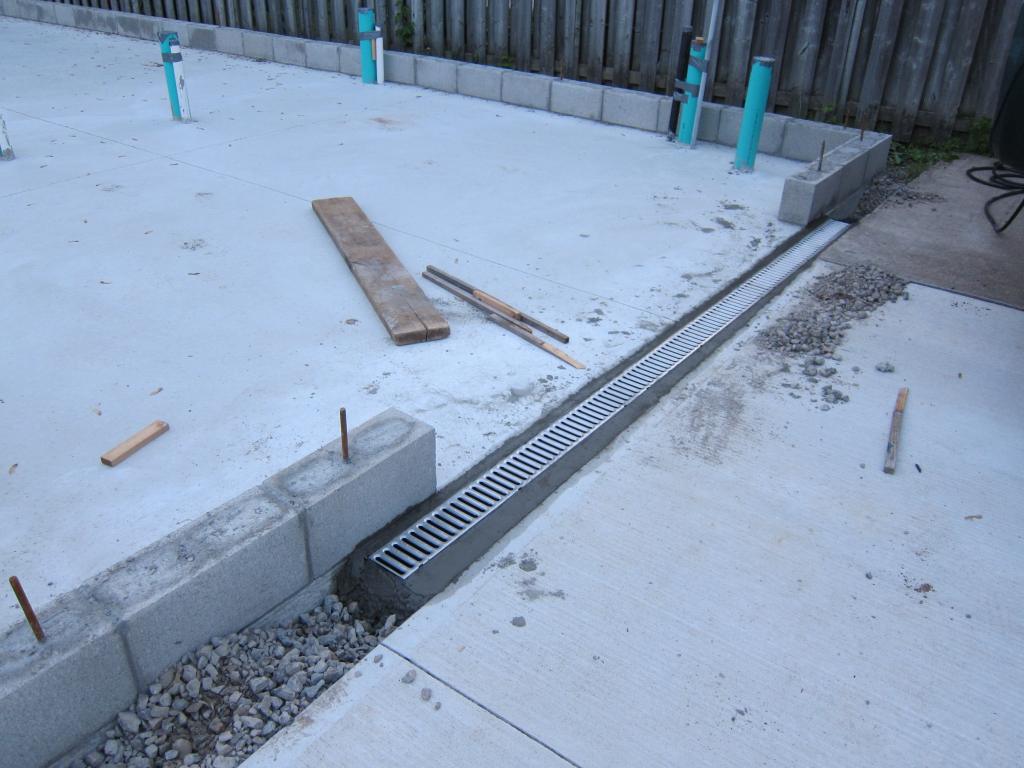
Finally, a few weeks after the pad was ready, a drain gutter was added between the pad and the concrete patio. This gutter connects to weeping tile that runs along the pad and exits behind the fence into a drainage swale behind the property (actually, a ditch beside a former set of railway tracks).

Framing:
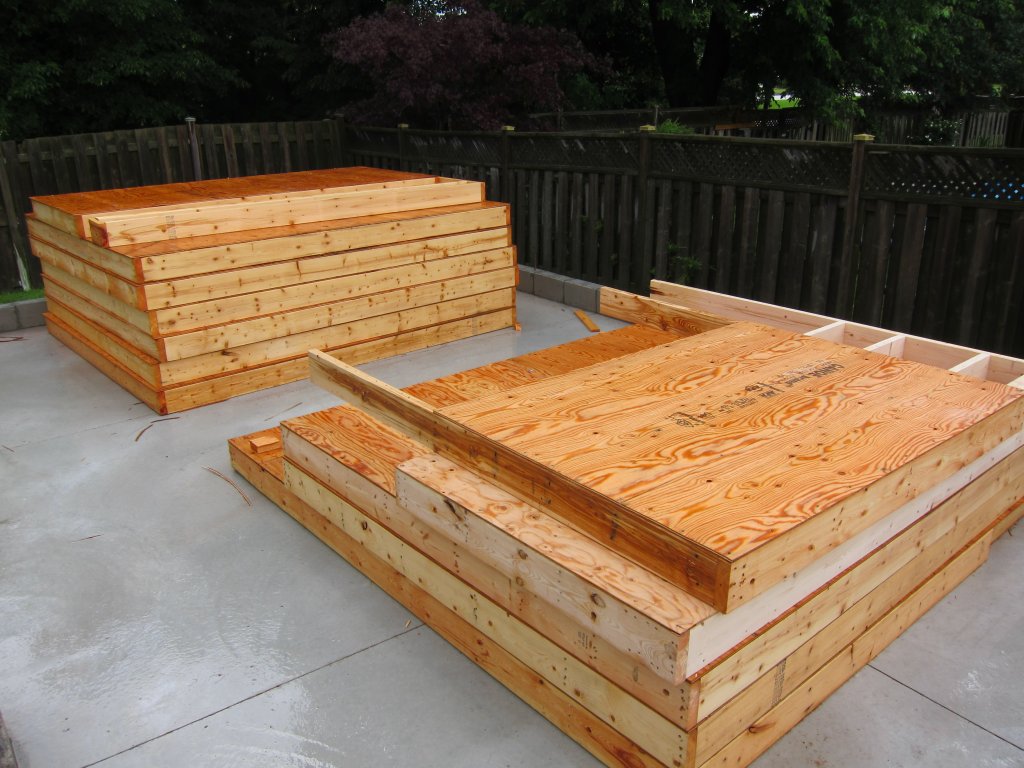
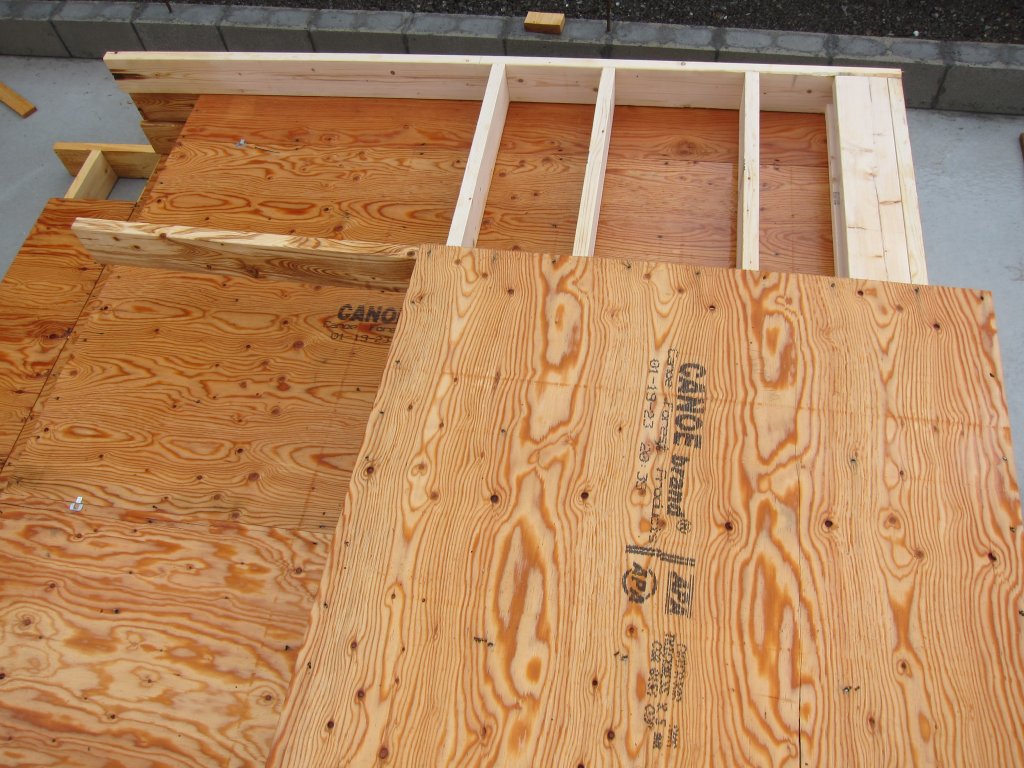
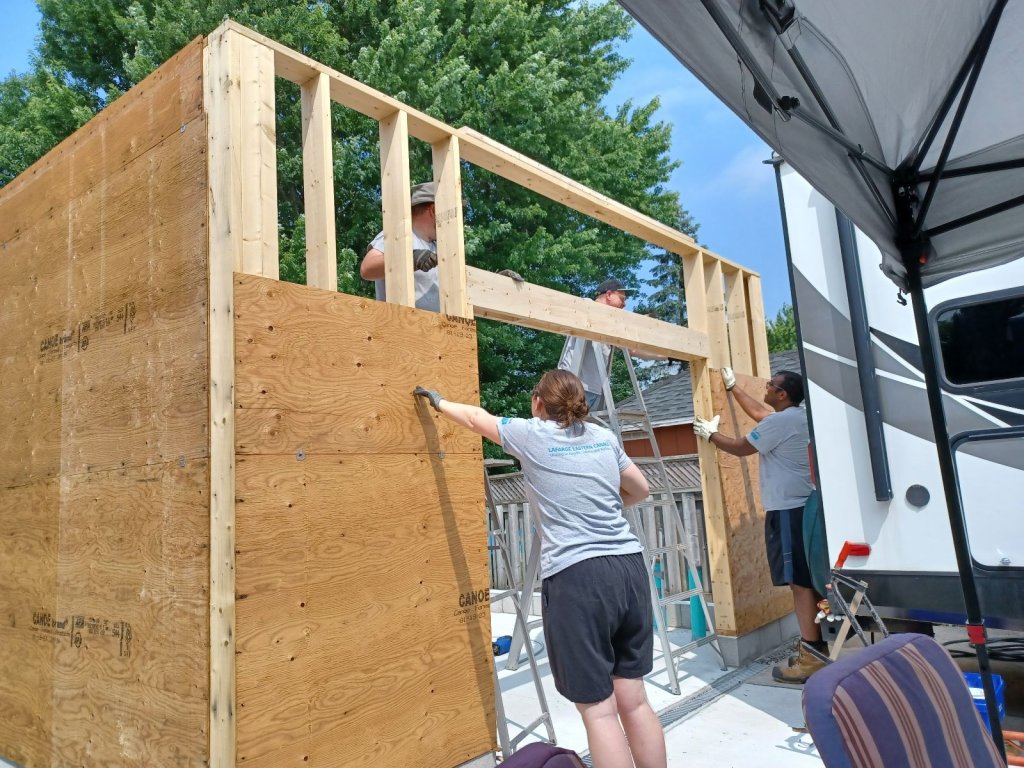
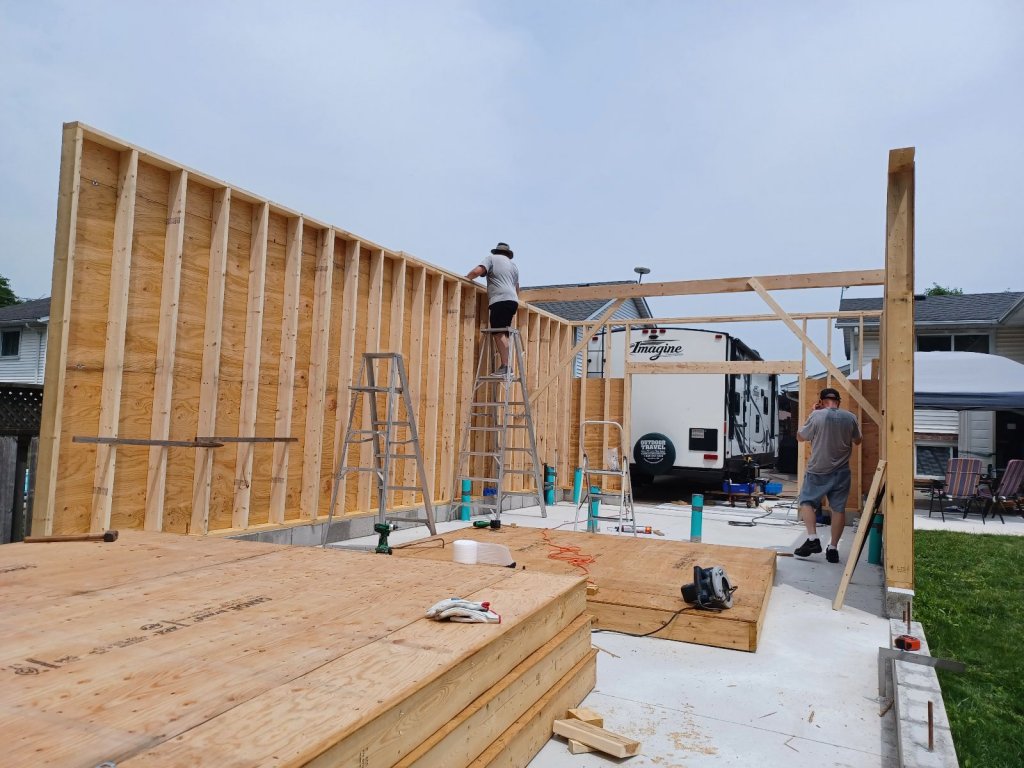
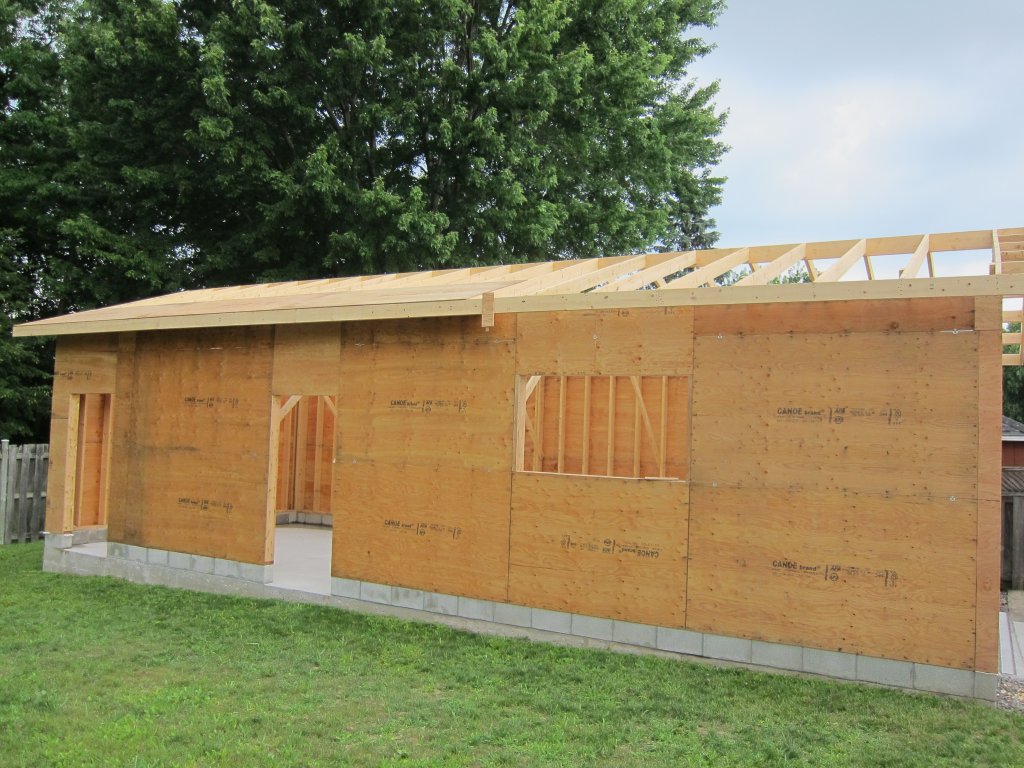
The walls were assembled as fourteen sections, most 8′ wide by 9′ tall, on the ground then erected. It all began as sections of sill plate, carefully drilled to match the bolts protruding from the blocks. 2×6 walls were then built and sheathed with 3/8″ plywood (which also helped square the sections). Total cost of wood for the framing, plywood sheathing, and roof sheathing was about $7K. Luckily, the (post pandemic) price has fallen since the previous year on almost all wood products with 3/8″ plywood sheets going for $28 (the price increased for the last 25 sheets for the roof to $31) and 104-5/8″ 2×6 wall studs going for $10.
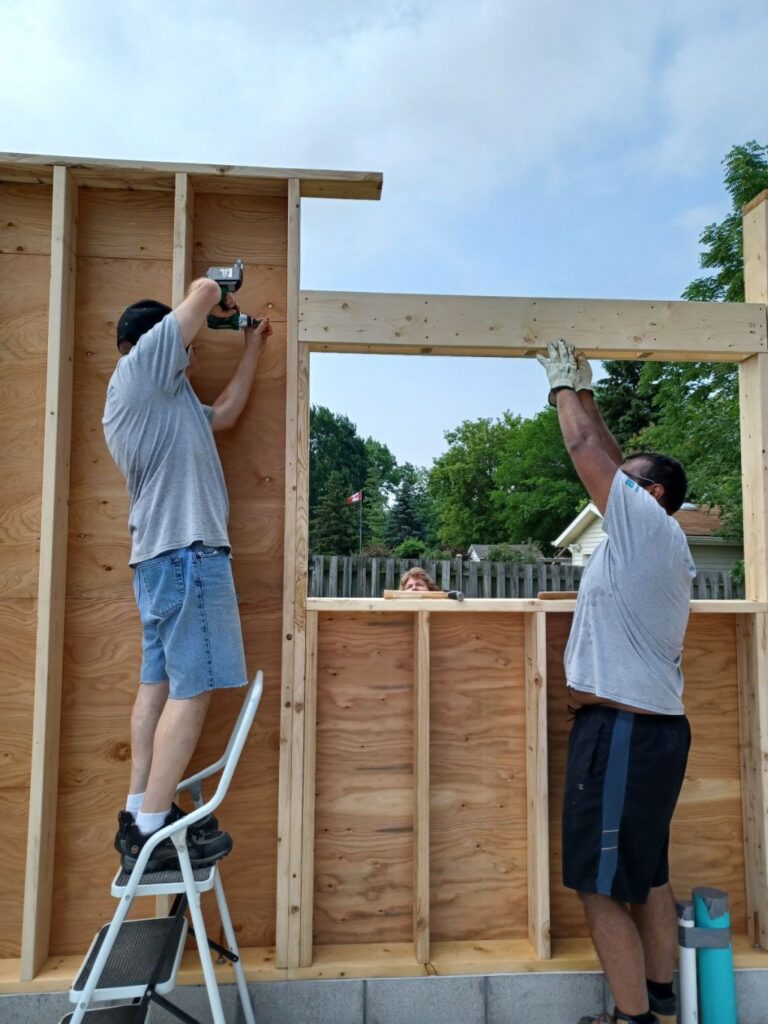
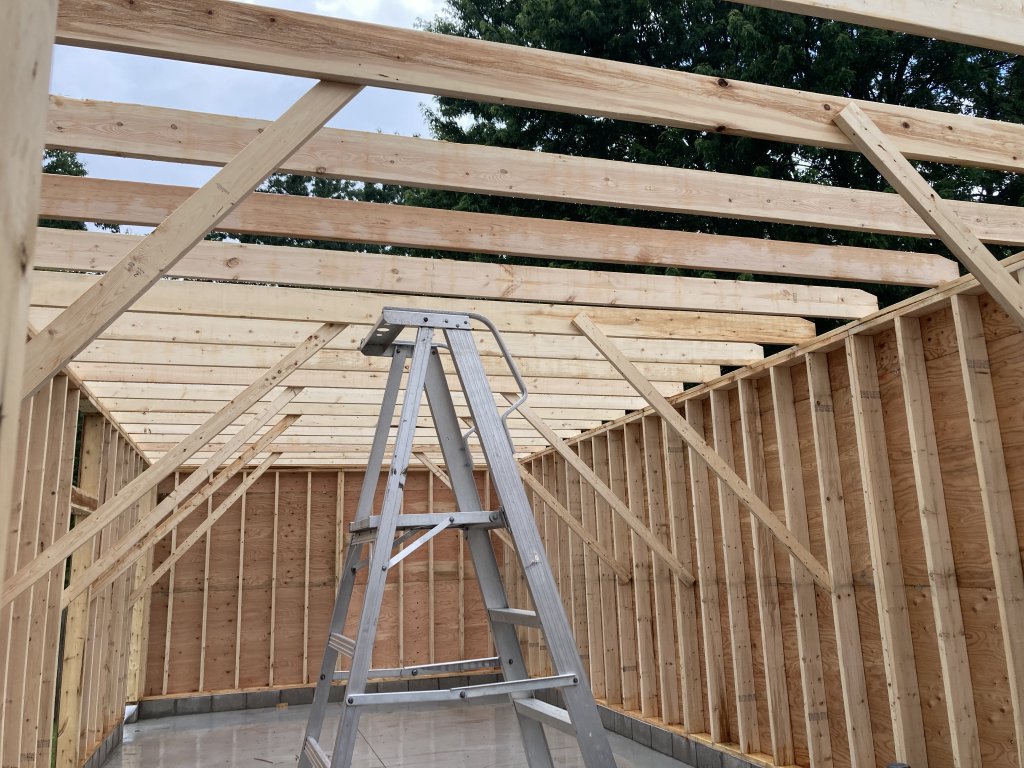
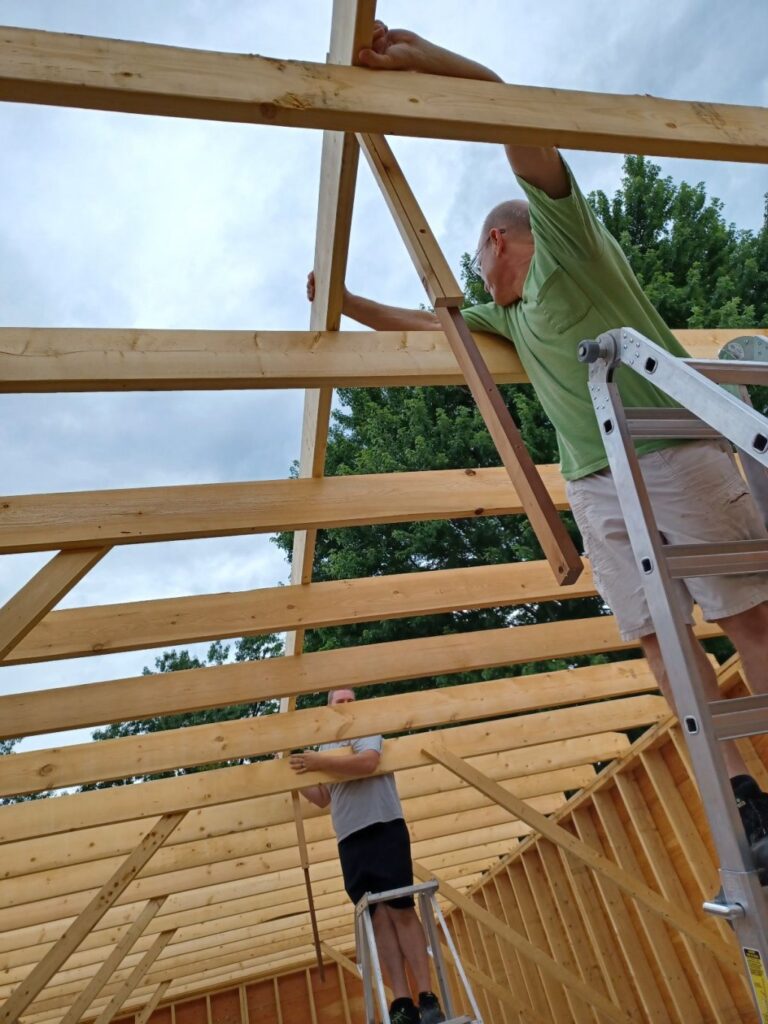
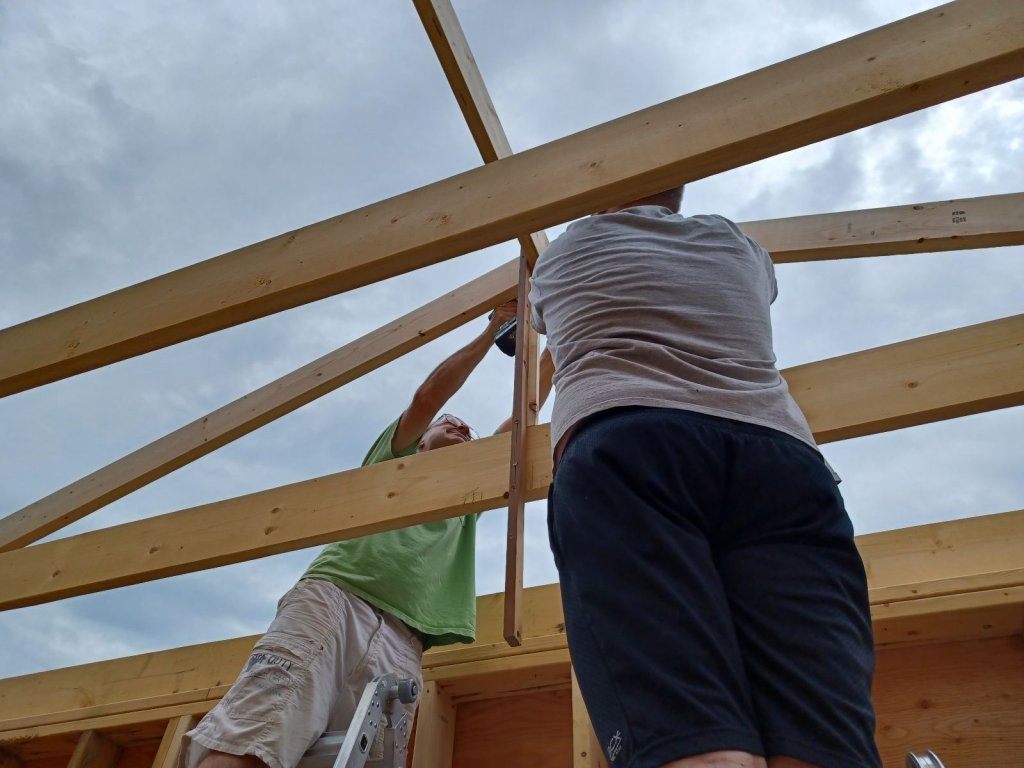
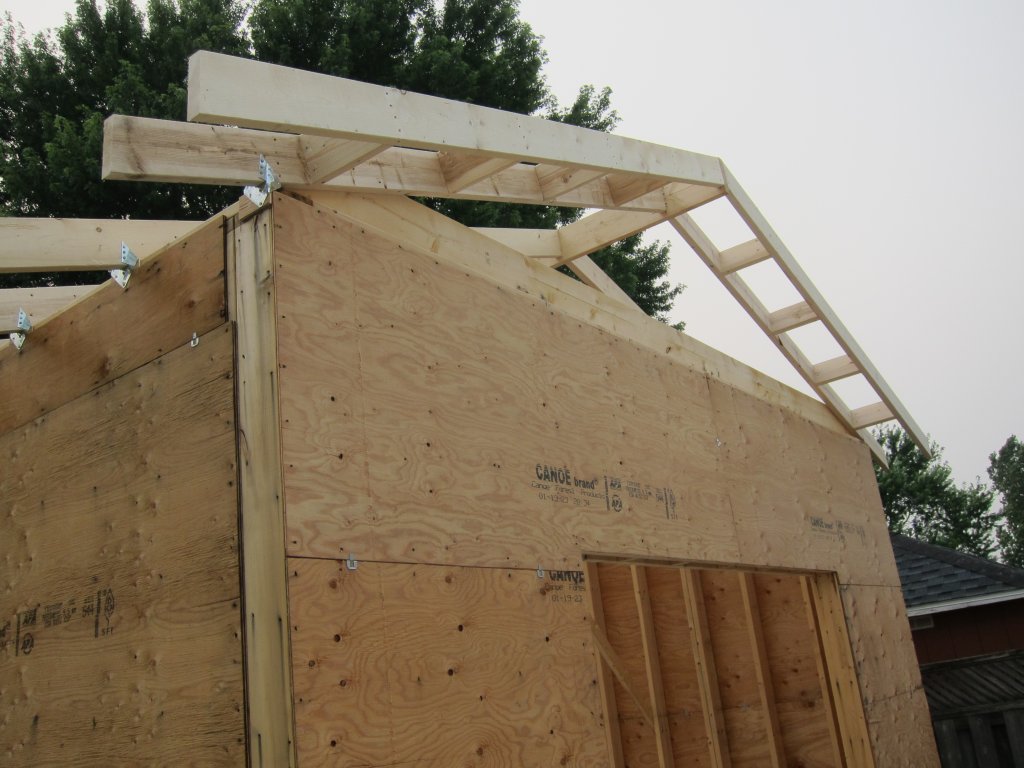
Assembled, the sections weighed hundreds of pounds and so we roped family members into helping us erect them – this went pretty quick and in one day all walks went up. During the same day five wall ties were erected to hold the walls together with the correct 16′ spacing. One more day allowed us to put up all 22 wall ties (the 2×8 ceiling joists). Rafters took an additional two days to put up – one day for the ridge board and a few rafters to support it and another day to finish all 22 including the rake rafters (the overhangs on the front and rear).
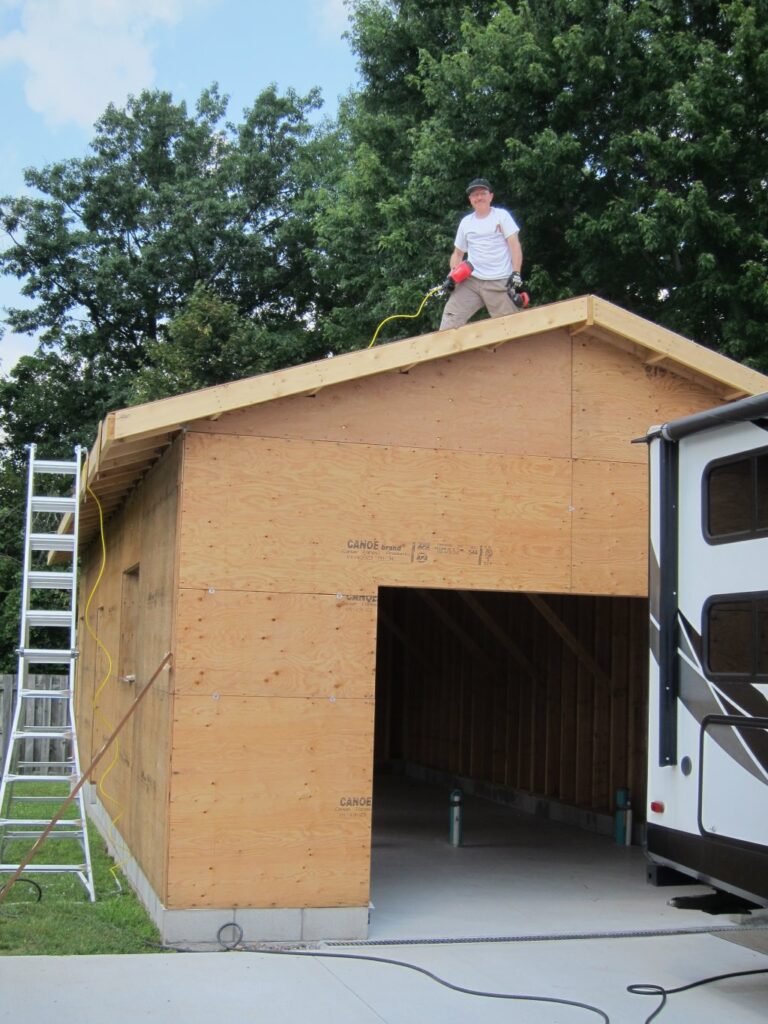
Aside from these ‘major’ tasks, many additional days were spent sheathing the structure, adding hurricane ties, building the roof deck (with 25 sheets of plywood – the hard part being hauling the sheets up to the roof). Roofers quoted at least $30 to just install the plywood sheets (and $100 if they supplied and installed them): to save a minimum of $750 we put them up ourselves over the course of four days (which wouldn’t have been so bad had it not been for the heat wave we had at the time). The nice thing about doing it yourself is getting the time to cut each sheet exactly so all sheets overlap rafters on the short edges.


Getting It Under Cover …
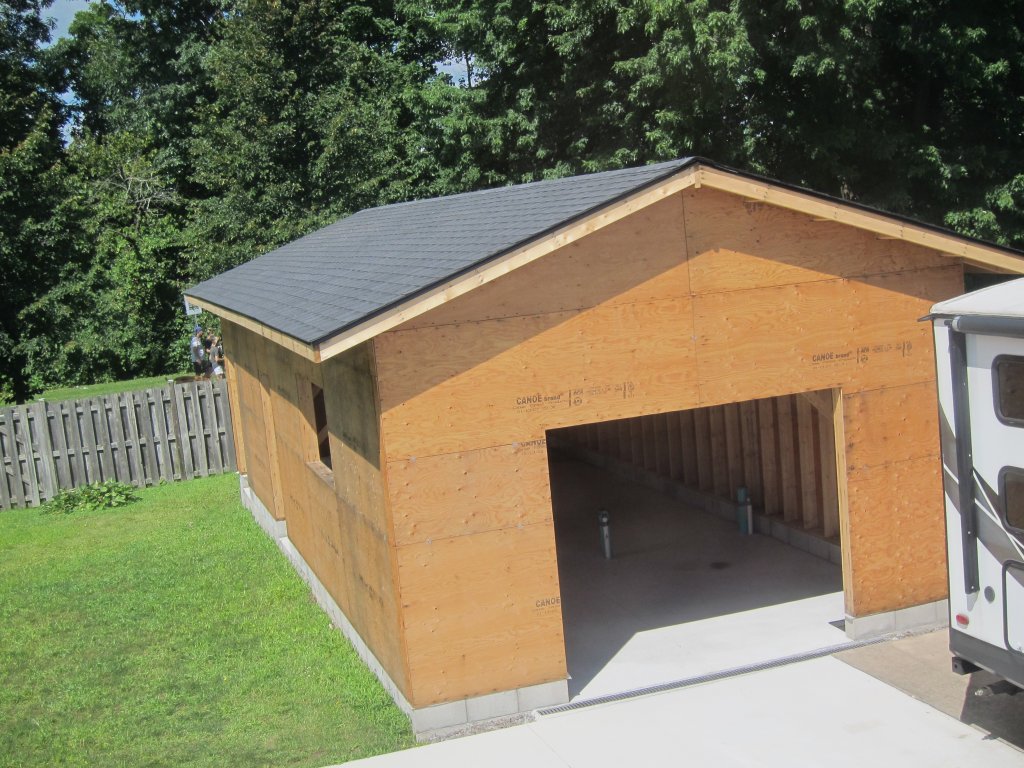
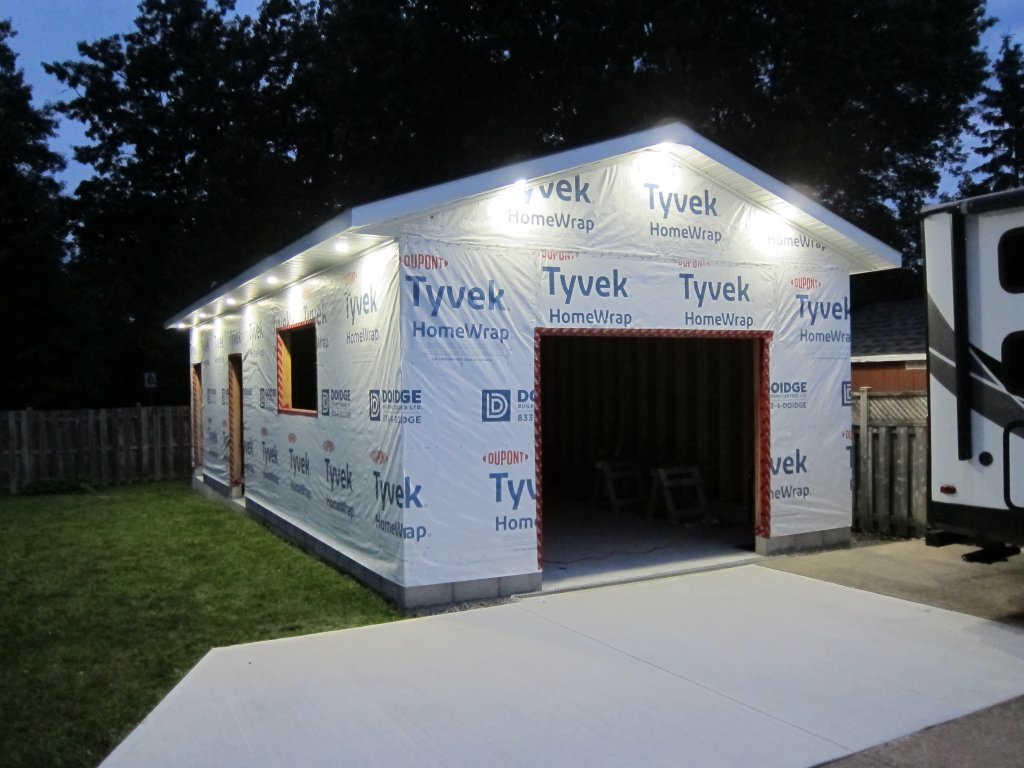
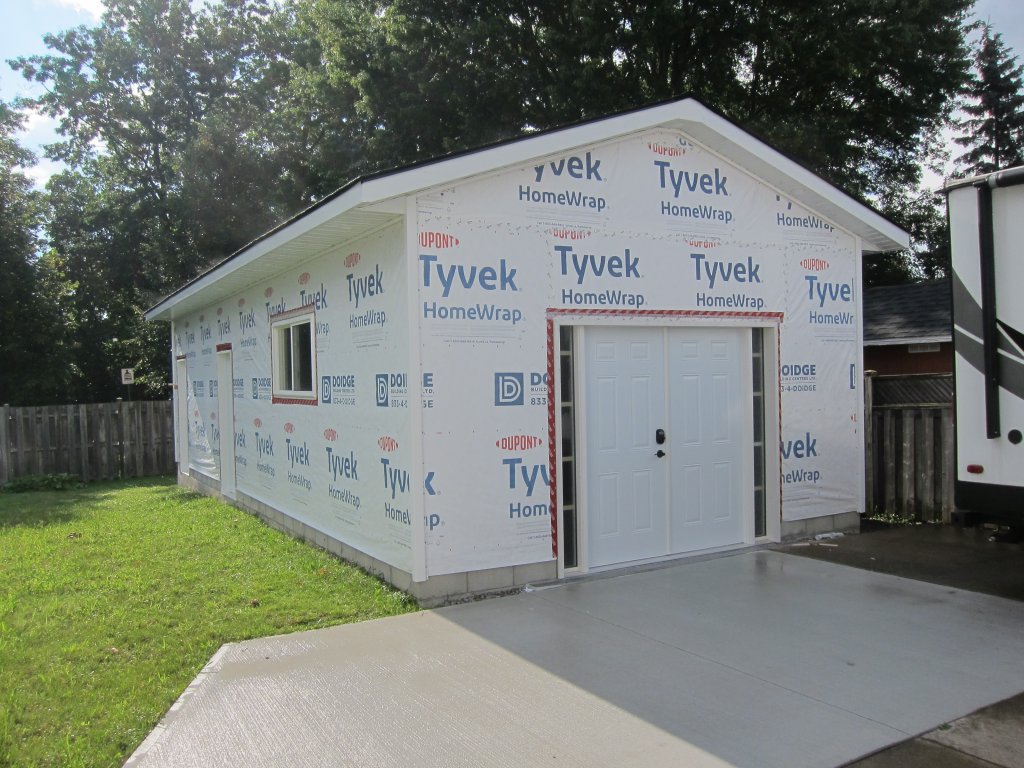
With the framing and sheathing completed, it is time for the roof shingles, tyvek, doors, window, and siding.
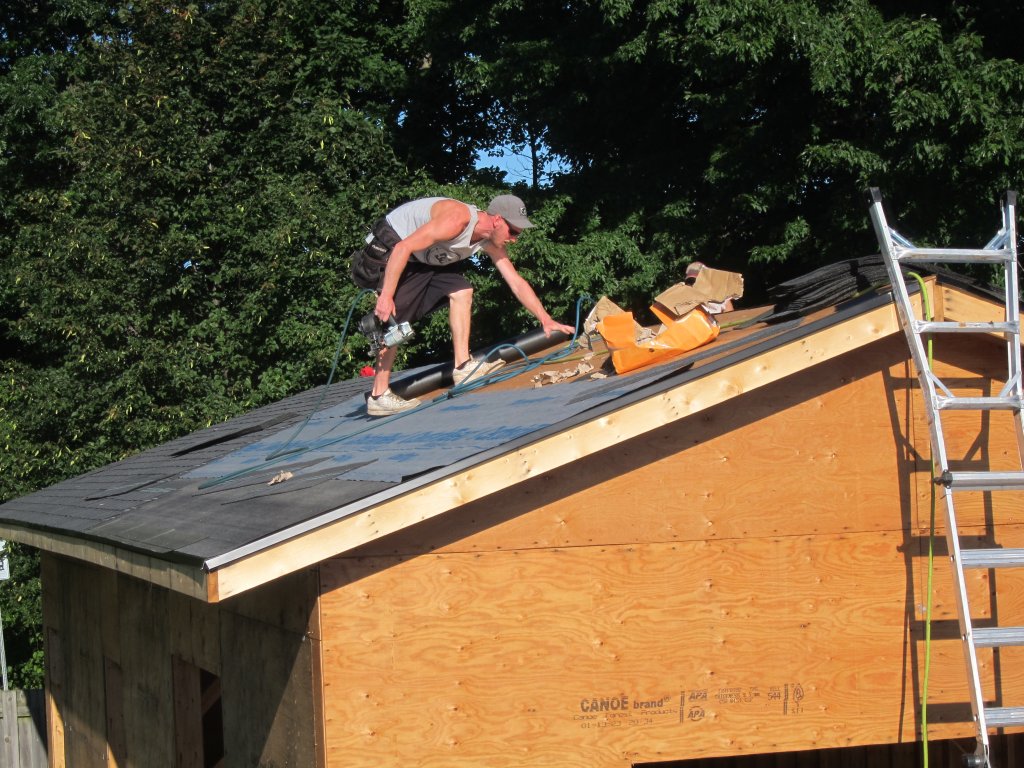
I was going to do the roof shingling myself, however my wife did not want me on the roof in the August heat. Quotes for roofing came in between $2700 and $6500 (although that figure seemed laughable for a roof with no removal). We chose a roofer using CertainTeed Landmark Pro shingles – 50 year warranty from the factory and the same ones we put on the house a few years back. At $3700, this hopefully means we will never have to re-roof it.
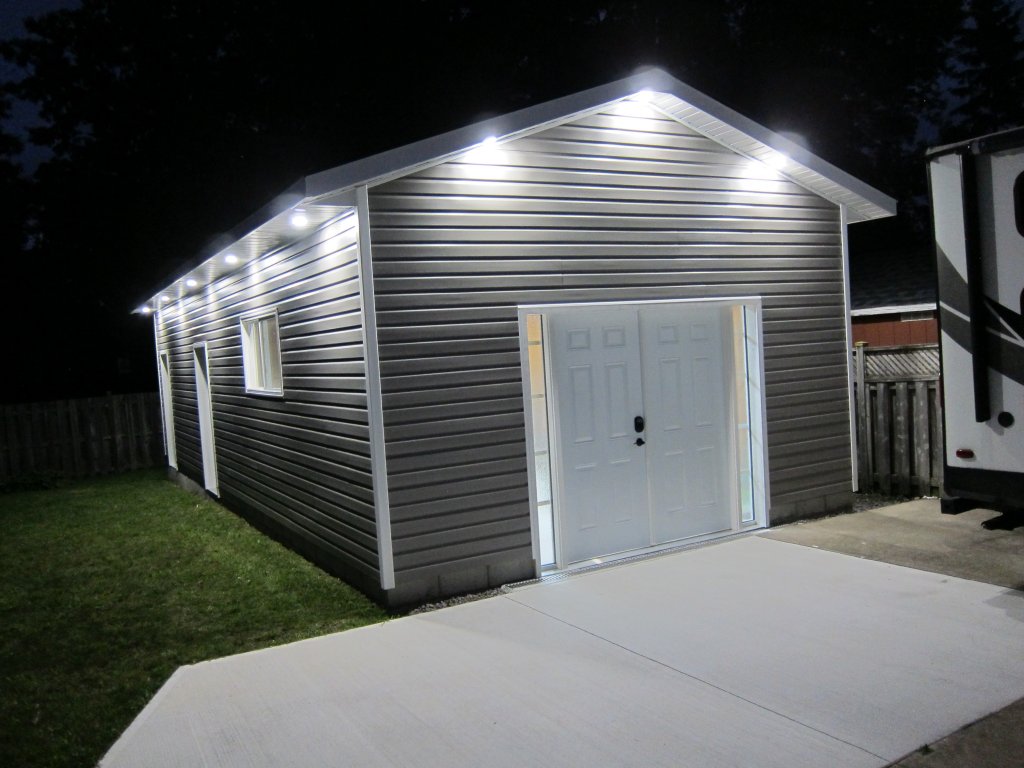
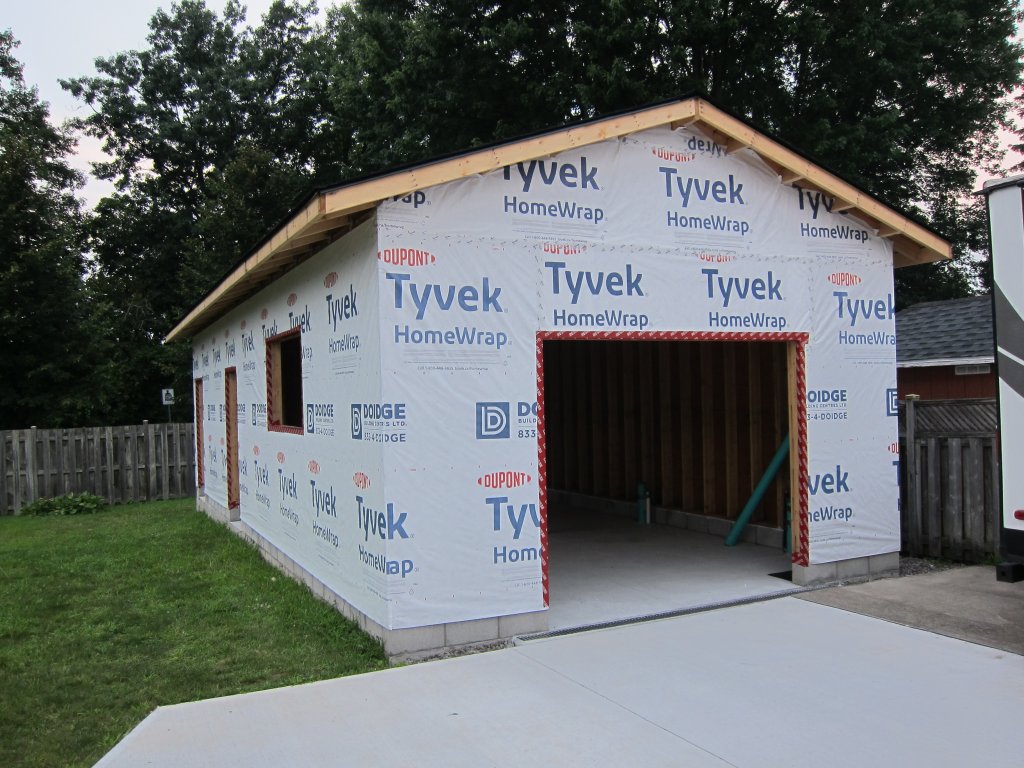
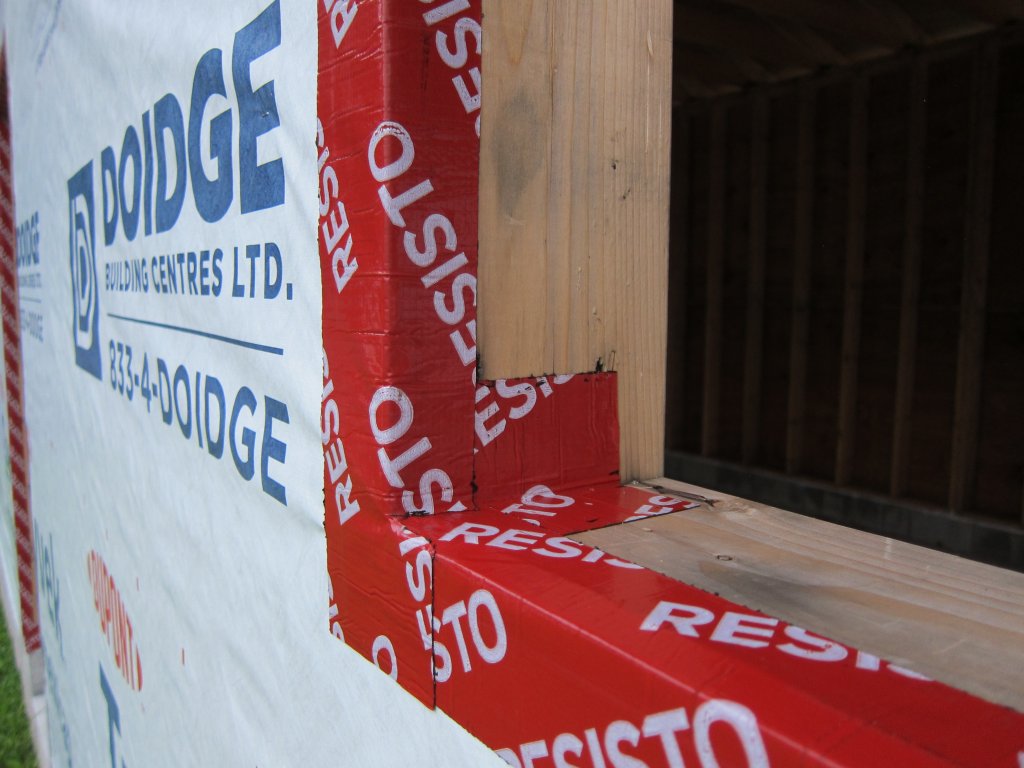
The outside of the building was wrapped in tyvek and butyl flashing applied around the openings for the doors and windows (one day). Lights were then added (four octagon boxes) down the center of the building and tied into an existing 15A circuit on the patio. Even thought they will eventually be powered from the 100A underground circuit that will feed the shop, for now the temporary connection was made to satisfy the building code.
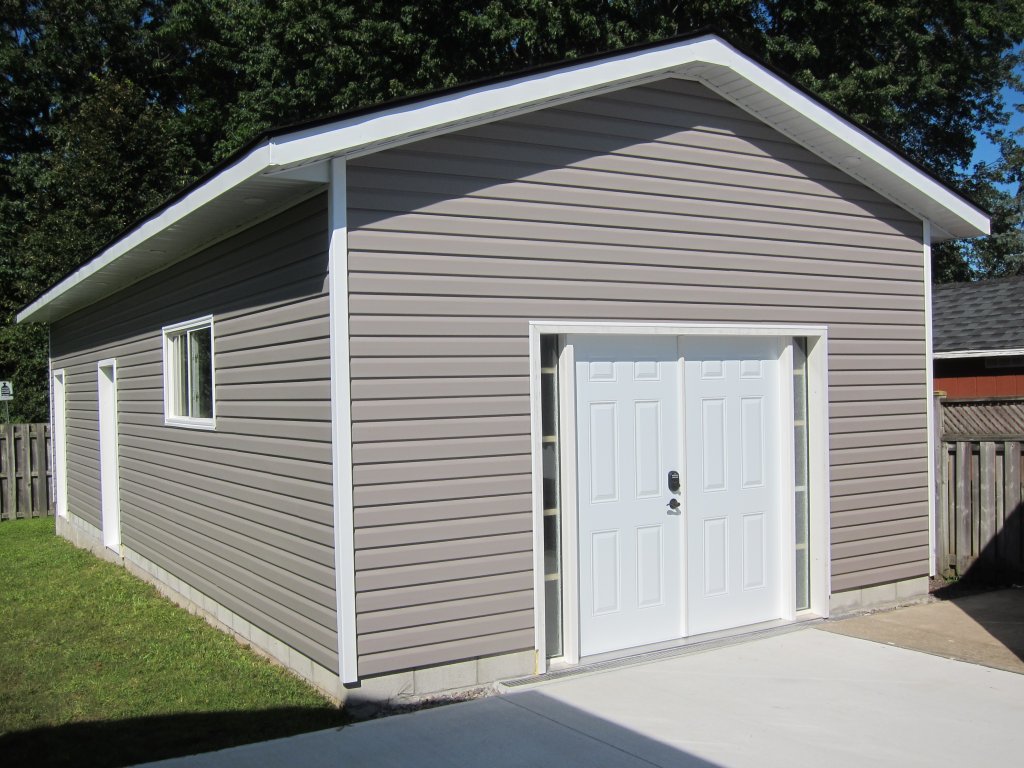
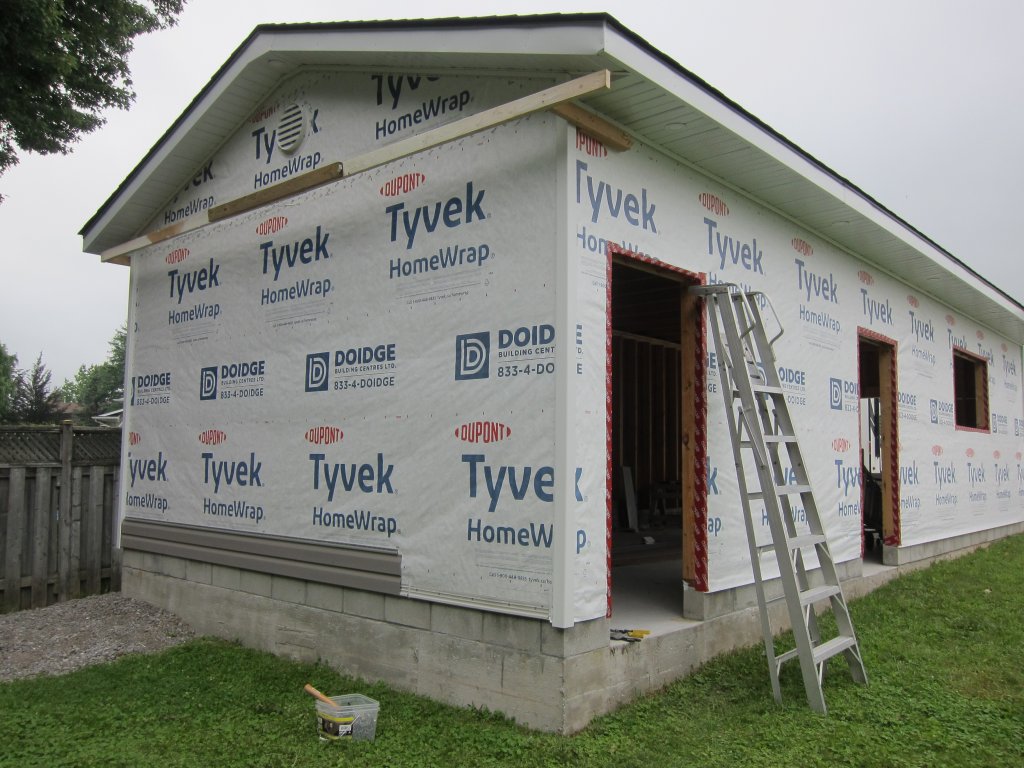
Soffits and fascia were next. Dual J-trim channels (at right angles) were run along the sides of the building and the front and back under the gable – one channel to receive the soffits and the other to receive the siding coming up the building. Both channels were screwed together with stainless screws so there is no gap between them. Aluminum soffit was the cut into lengths and installed to cover the eaves with non-vented siding used on the front/rear rake and mostly vented used on the sides (giving 200 to 240 square inches of venting). Pot lights were installed at this time (easier now that to retrofit later, and a better job since wiring can be stapled and run through drilled holes properly). Twelve 9W LED lights were used (three on the front, five on the side facing the yard, three on the opposite side and one in the rear). Fascia was simple enough although the area under the ridge board required special attention to cover it properly. In all, it took five days to complete the fascia and soffits (and of course this meant the upper J-trim for the siding was installed as well).
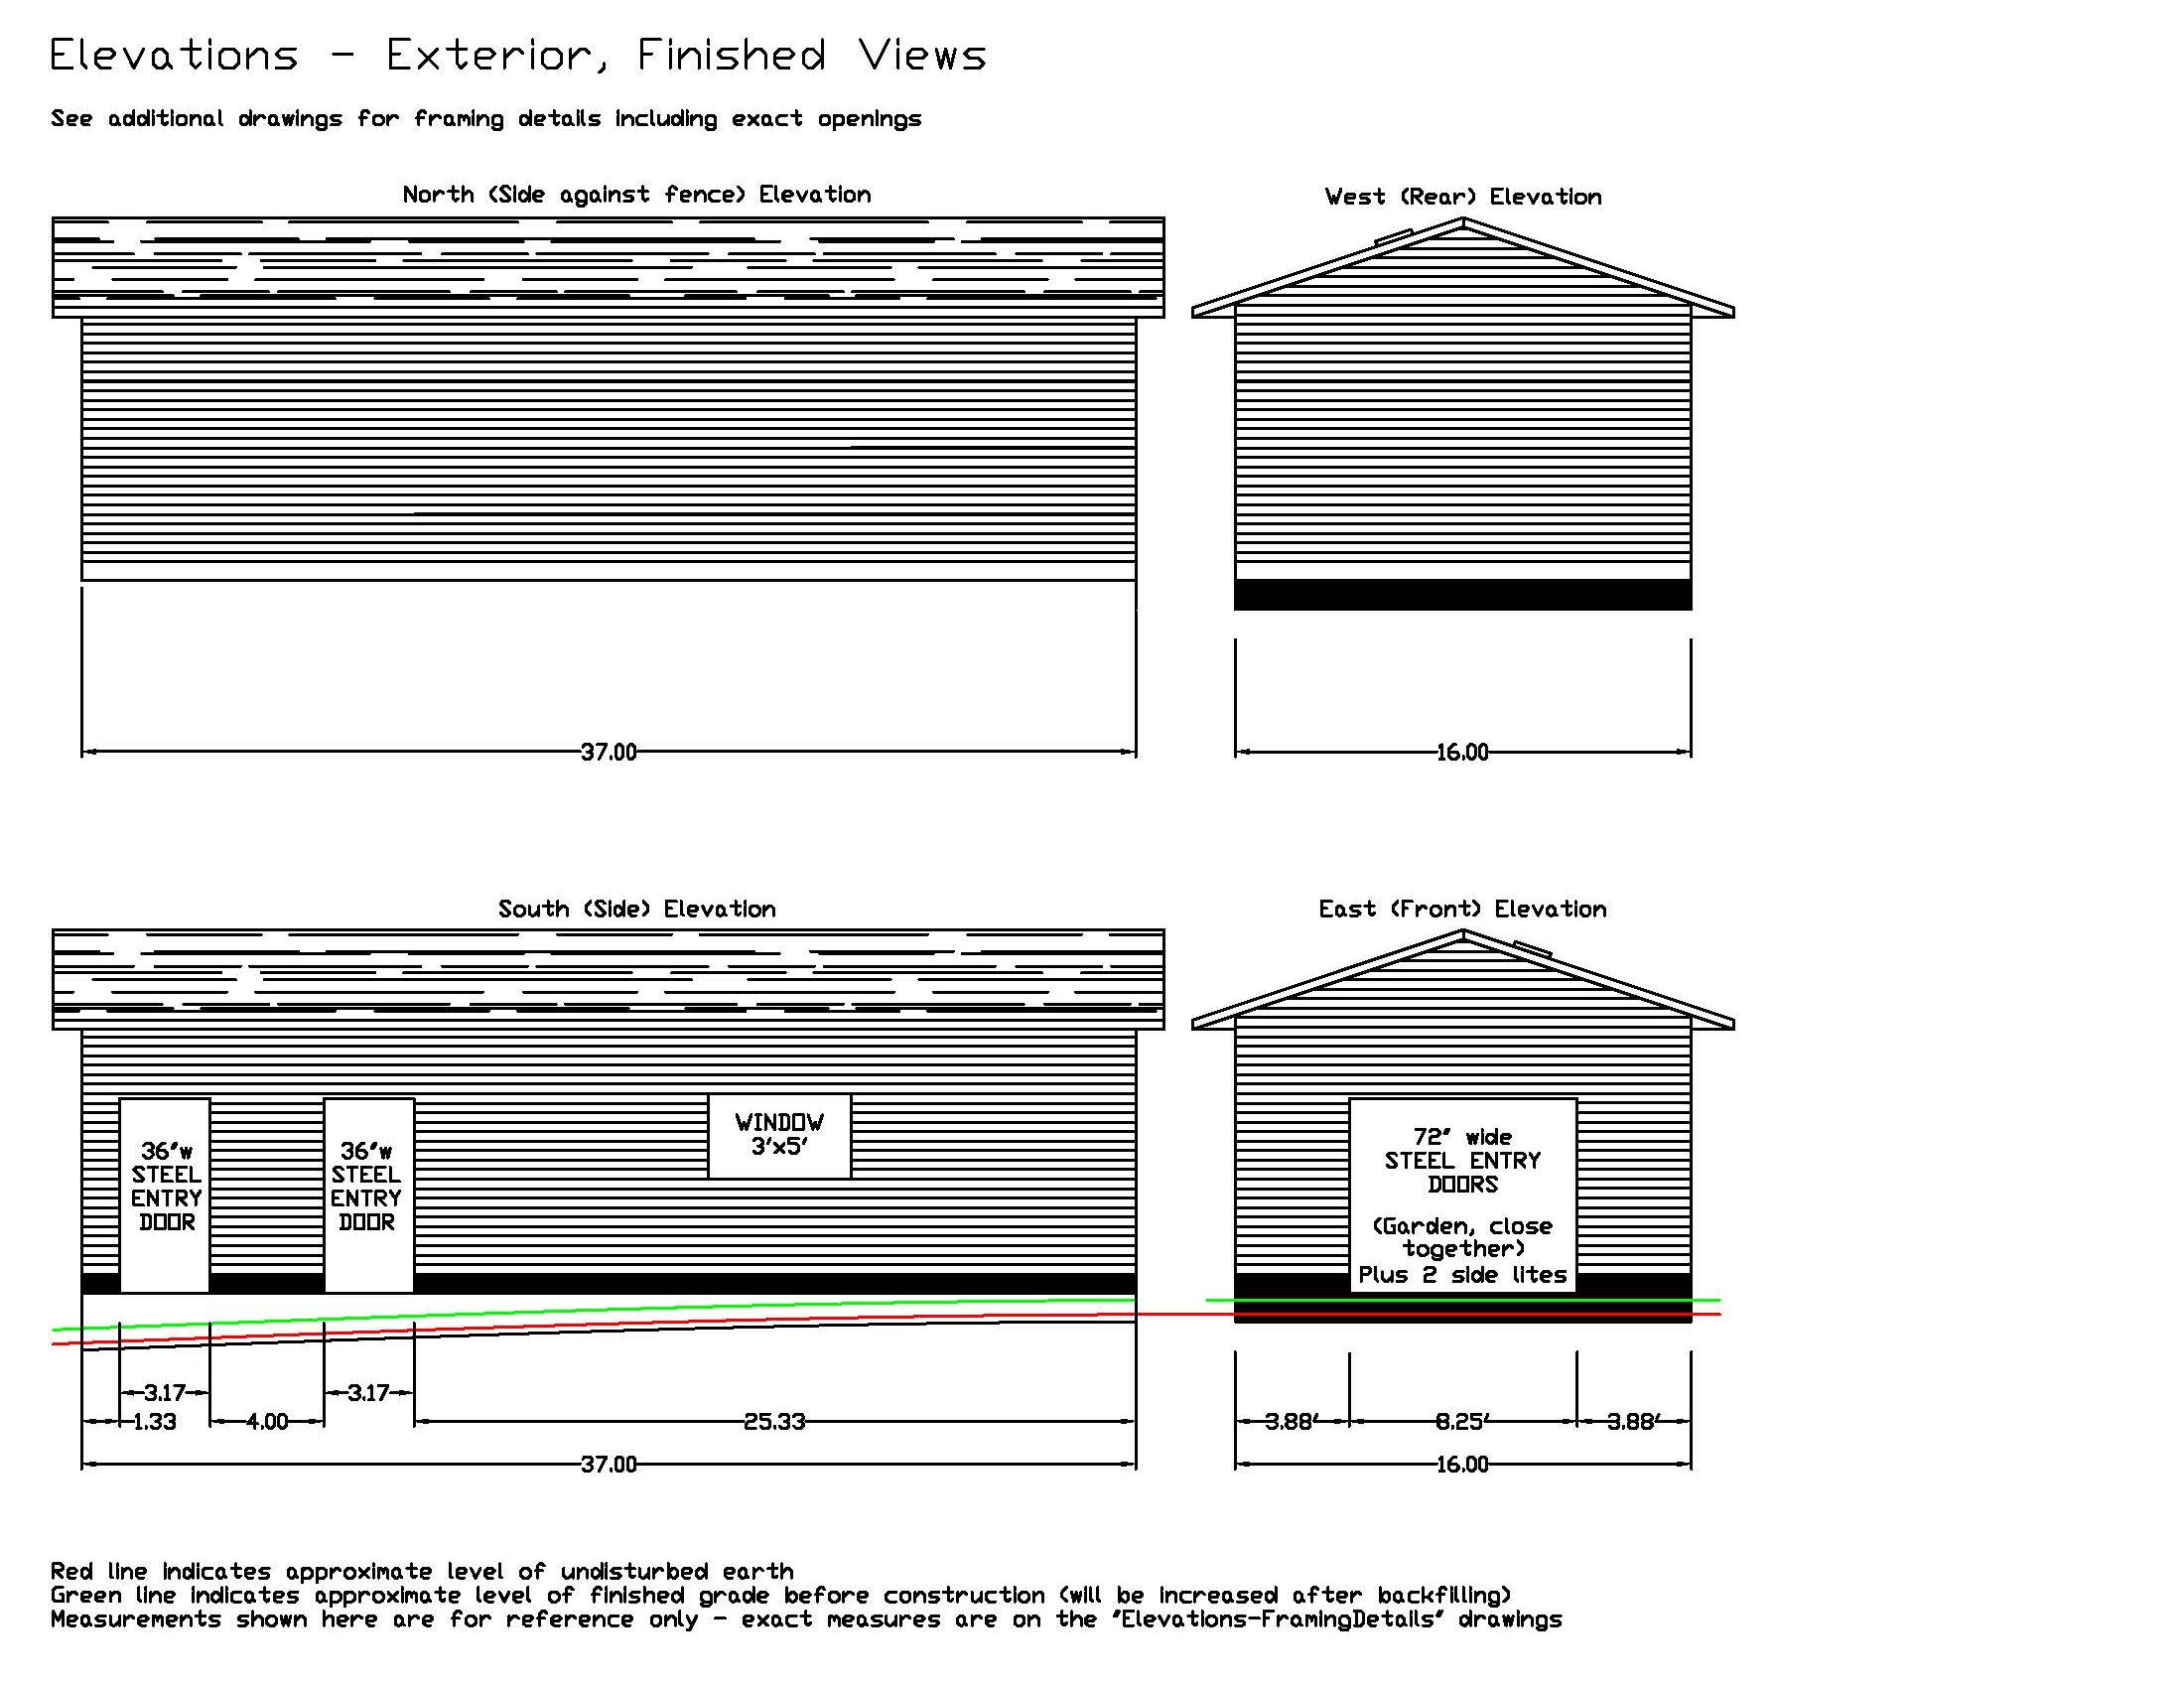
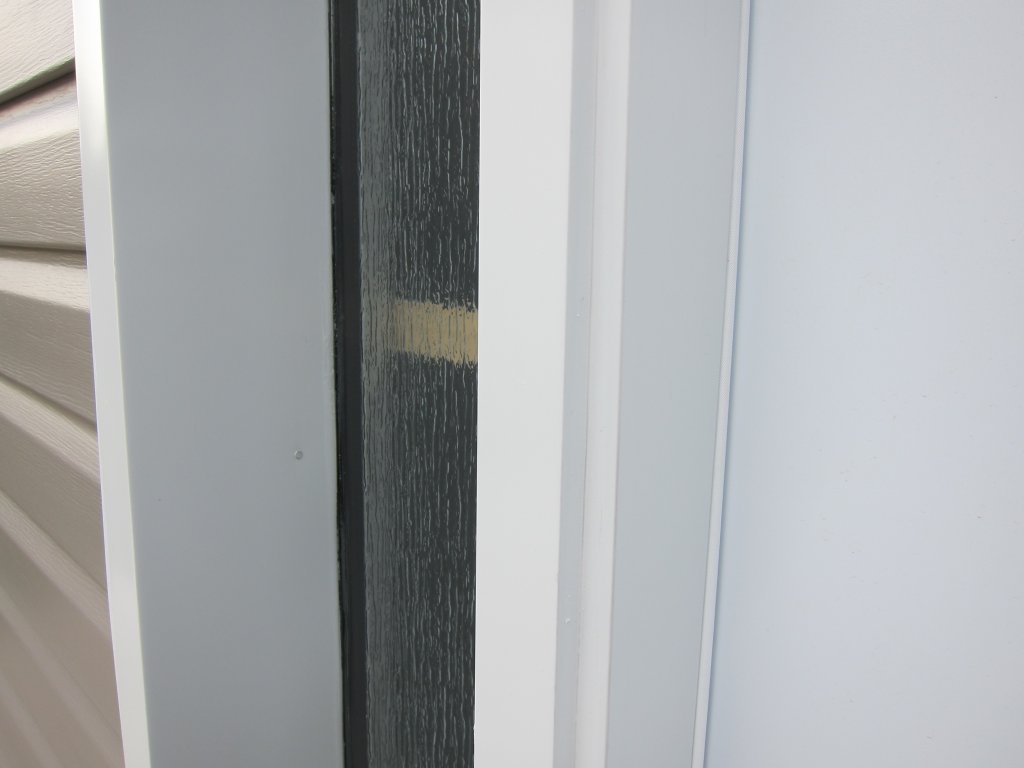
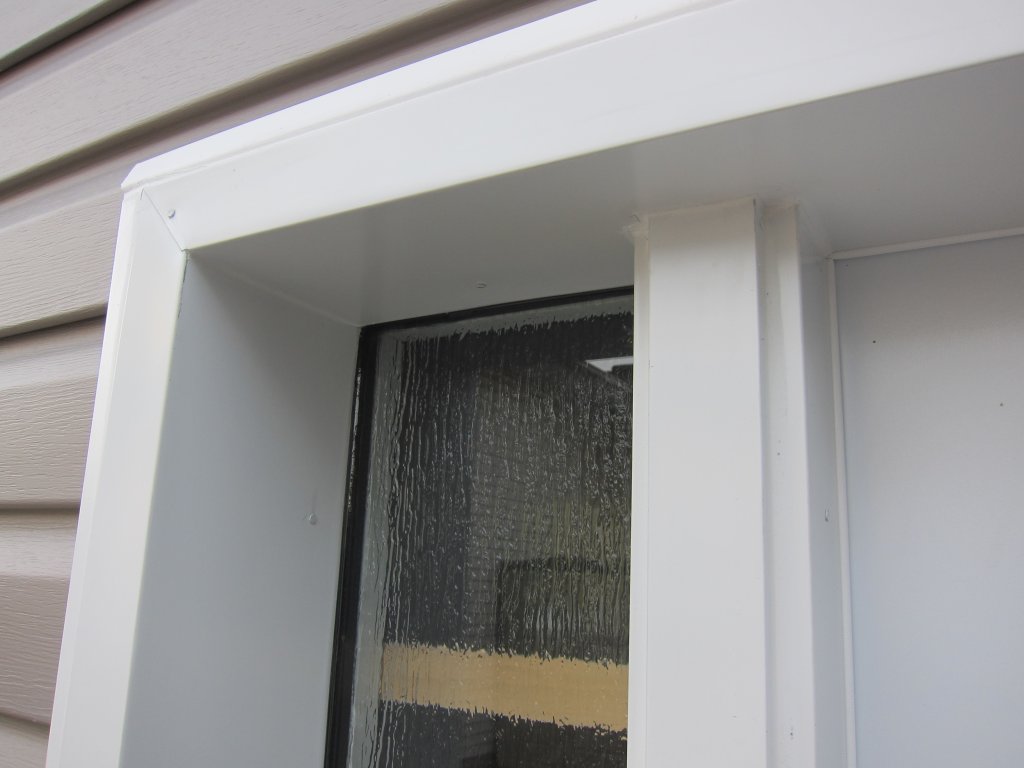
The window was purchased on marketplace – a brand new window of an odd size which was never installed for $200 (it would likely have been $500 to $600 to purchase an equivalent one). Low-E argon, this is a pretty decent window (and since we’ll be heating with a heat pump, the energy savings will be appreciated). Of course it was purchased before we built the framing so we knew the exact size of the rough stud opening. The 64″ width also meant increasing the lintel above the window to two 2x8s (instead of 2×6 in the plans).
The doors were high quality and purchased from Niagara Prehung. Not cheap, at $6300 for the front plus the two man-doors, however the main door is a custom unit with two doors opening onto each other with an astragal with three lock bolts (top, middle and bottom) and two side lites with ‘rain’ pattern glass – the door is downright beautiful. It fits into a 98″ wide space so one could replace the doors with a standard 8′ wide garage door if desired at a later date. Installation of all doors only took a day.
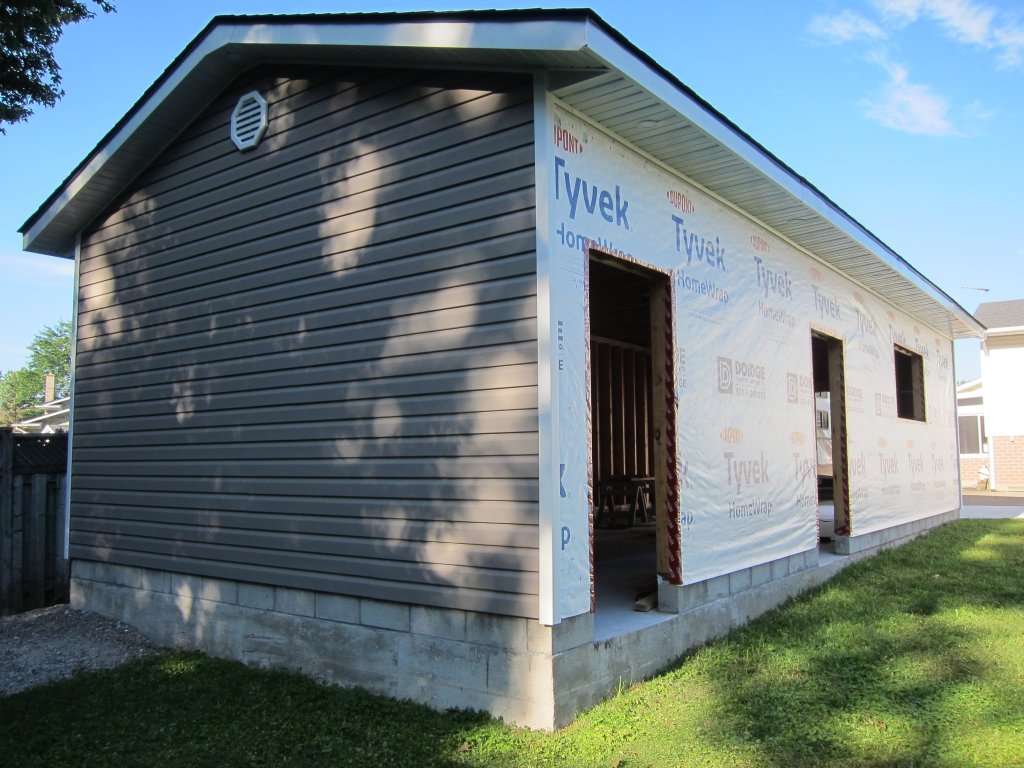
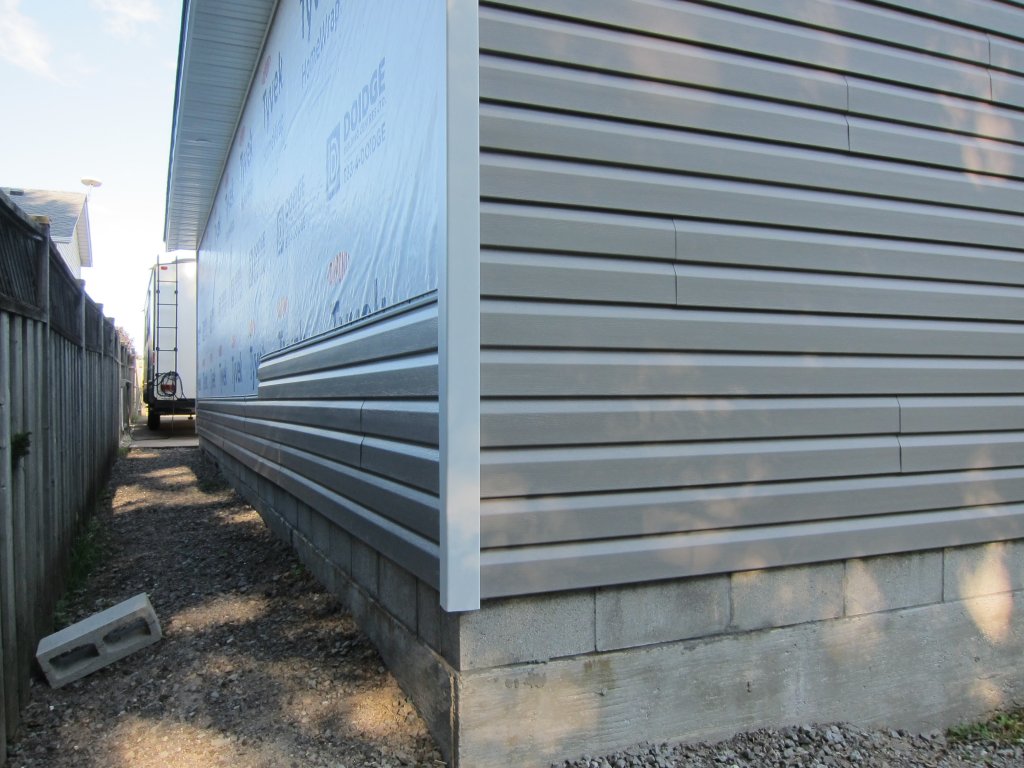
While waiting for the doors to be ready, we began by siding the rear and north sides of the building which were straight runs. Siding these two walls took three days to complete – the peak on the back took the best part of a day and the majority of the long side only took a day. In the case of the peak, my fear of ladders required the addition of a 2×4 stabilizer across the back of the building where the ladder could be tied-off to minimize rocking (the peak, there is 15 feet above soft ground). With the doors installed and brickmold nailed to the outside, J-trim was installed around all and siding on the two remaining walls could proceed. The siding, ‘Mitten’ brand, was easy enough to install and locks together nicely. In all, vinyl siding (1000 square feet), aluminum fascia (120 feet), and aluminum soffit only cost $2000.

Services
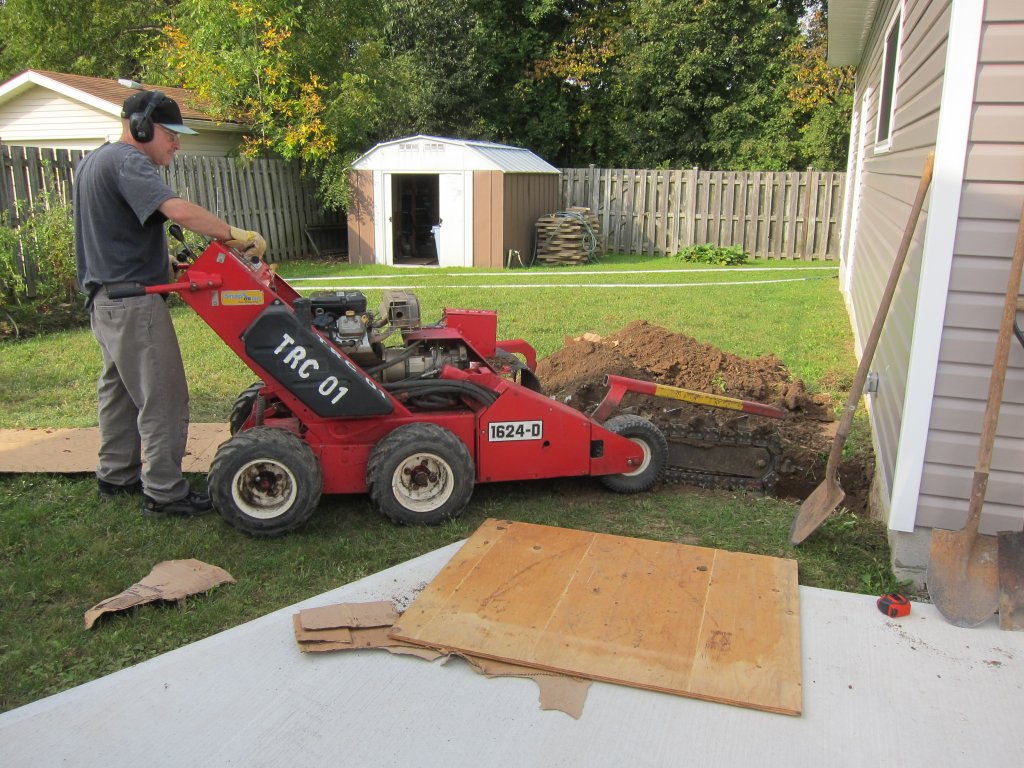
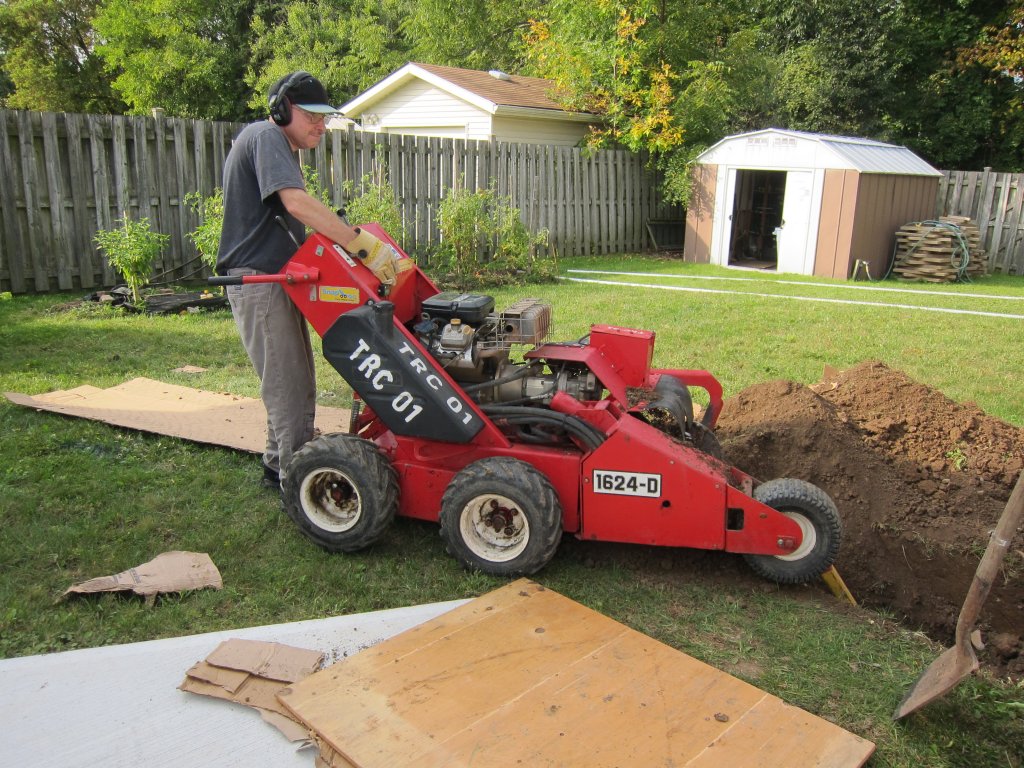
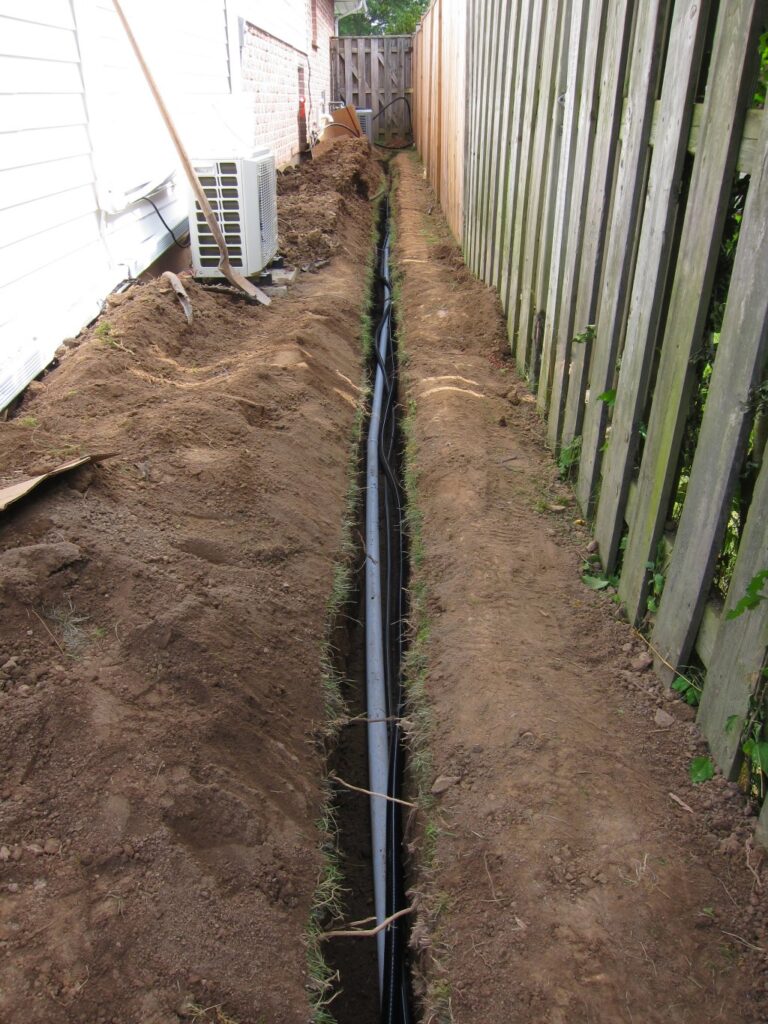
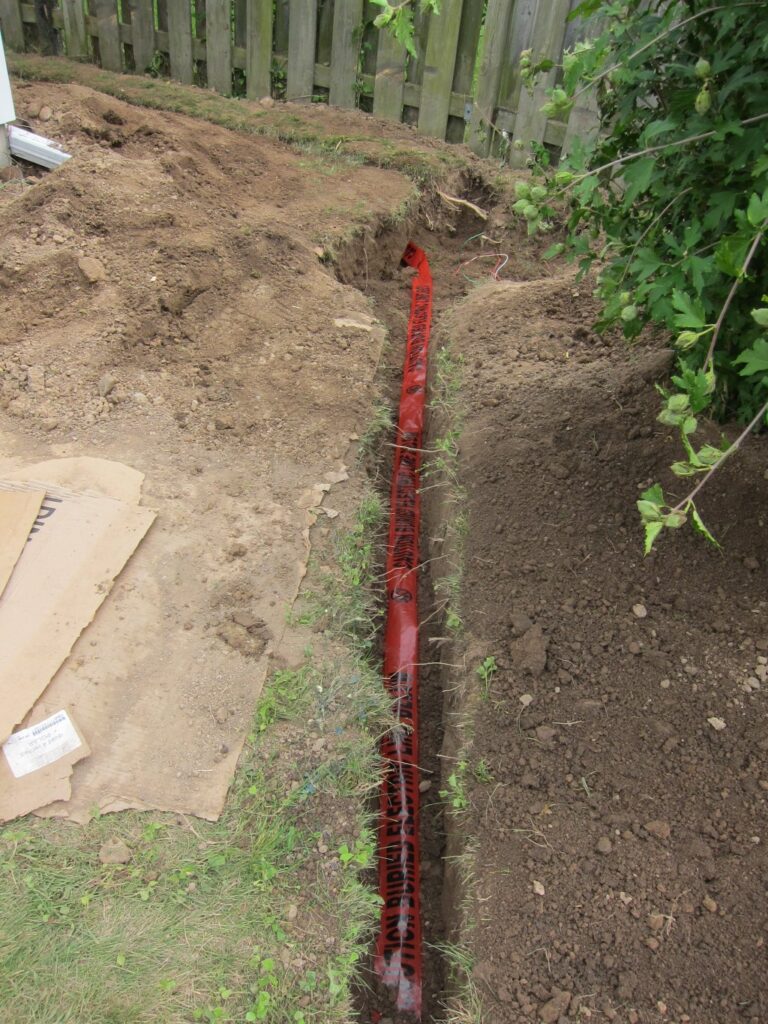
With the shell complete, electrical service was the next major install. A three-foot deep trench was dug from the house to the shop for the electrical cable as well as other services that might be desired in the future including alarm and communications cables. The soil is hard clay so a trencher was rented for a day ($485 including tax and delivery). It took one solid day to dig the 100 feet of trench and a second day to clean it out from the dirt that fell back in – unfortunately there is little clearance on the side of the house so soil piled-up quickly and some fell back into the trench requiring a clam-digger to clean it out. Pits were dug at the ends of the trench where the lines went into the house and into the shop. For the shop side, lines were dug from the pit horizontally under the concrete pad to intercept conduits already poured into the pad: this was a lot of digging but eliminated the need to drill any holes in the shop pad. A hole was needed in the house wall which was drilled with a Hilti. Altogether, digging the trench, running the lines, and filling it in again took five days or work.
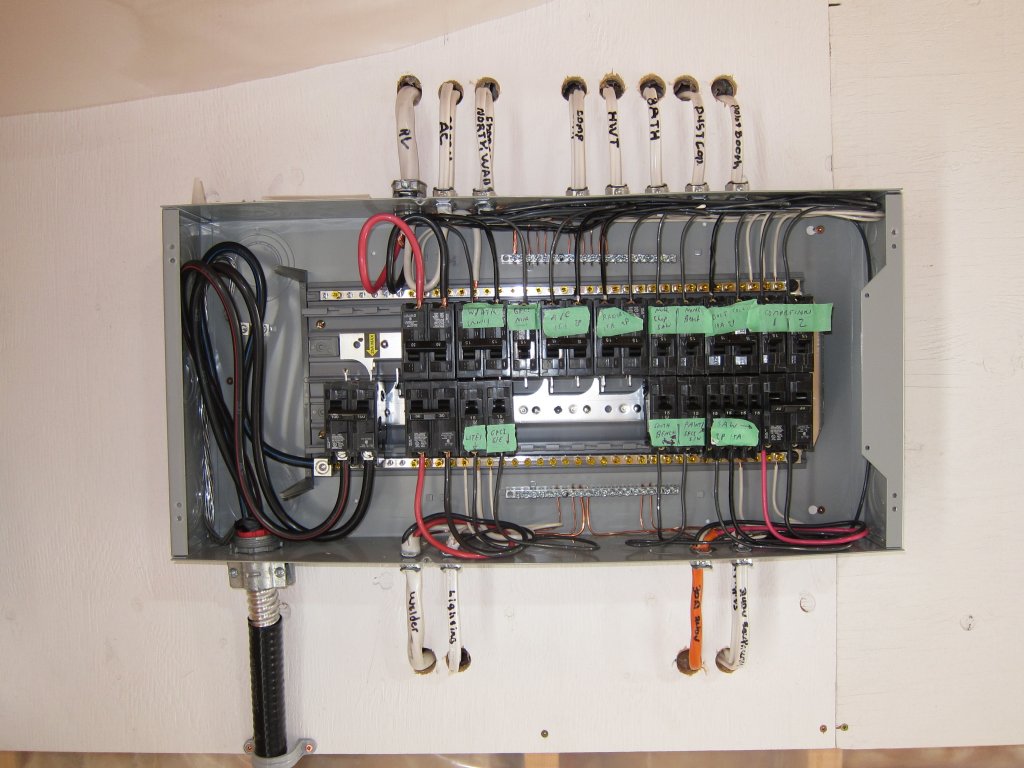
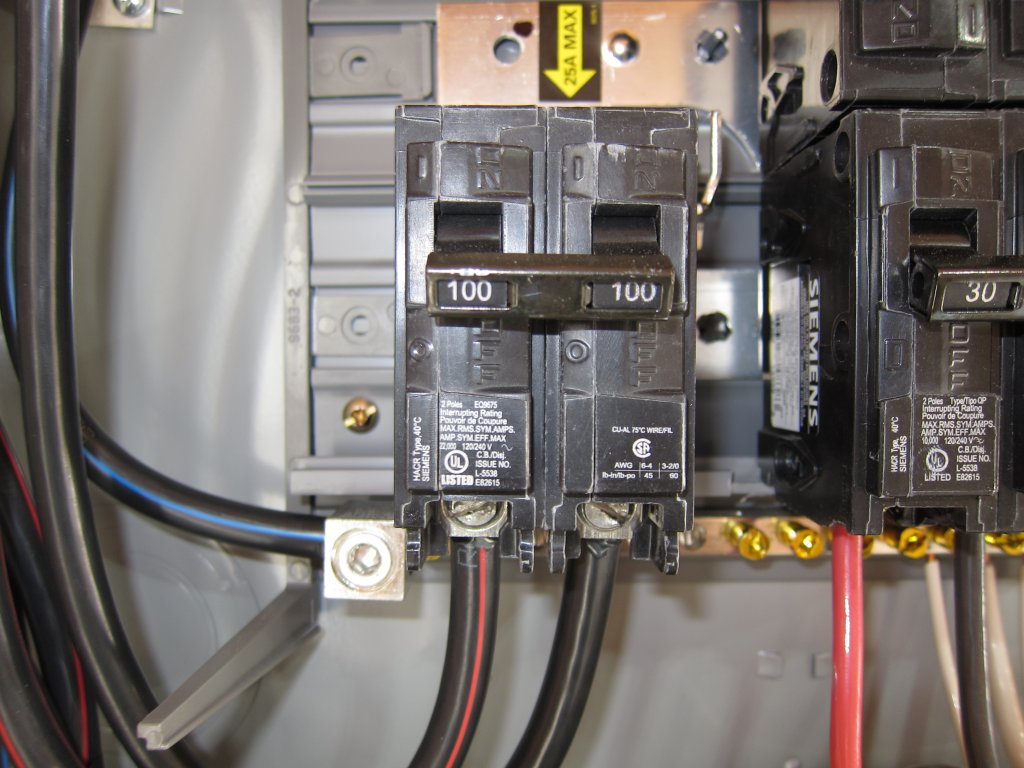
The shop features a 32 slot Siemens panel (100A) with an ACWU-90 (aluminum Teck-90) cable of 1AWG/3C feeding it. The house was upgraded a year prior to 200A, primarily because utility companies in the region are already denying upgrades to 200A for single-feeder neighbourhoods in other cities – with all those requests to upgrade panels to handle large EV chargers many neighbourhoods just can’t handle all the current required so it’s “first come, first served” for upgrades. Aluminum wire was used for the underground feeder due to cost as the copper equivalent would be about three-times the cost (or about $1500 for the wire alone).
Aside from the usual 120V circuits for lights and workbenches, the shop features a number of 240V/15A (6-15R) circuits for large saws (the radial and the planned cabinet saw), motors (the dust collector), and the heat pump. Two 240V/30A (14-30R) circuits were installed for a future large motor (up to 5 HP) and a welder (a 200A MIG needs about 27A), and a 240V/50A (14-50R) circuit was installed for the RV with a receptacle on the outside of the shop. The current RV only needs a 120V/30A outlet however it seems like all the new units are wired for 50A service so this is really for future use. All of those two-pole breakers sure consume a lot of real estate in the panel!
Of course the wiring was all permitted and an ESA inspection certificate issued – after all it is insured. While waiting for the inspection we started capping the doors with aluminum – a friend lent me a brake and we spent three days capping (the bending was the easy part – installing it and caulking it around the windows aside the main doors was quite tedious).
Sizing The Heat Pump
Early-on the decision was made to use a heat pump, this eliminates the need for a second trench (since gas lines and electrical lines cannot sit in the same trench) an with the price of natural gas rapidly increasing it made sense … but how large? Luckily for me, I taught thermodynamics for several years – it was one of those ‘other’ courses professors get stuck with but it did offer me the ability to try to make some practical use of it.
Heat transfer by conduction (i.e. heat loss through any surface of the building) is given by Q=k•A•ΔT/d where k is the thermal conductivity of the insulation, A the area, ΔT the difference between the indoor and outdoor temperatures, and d the thickness of the insulation. The ceiling, for example, is functionally 15′ x 36′ or 50 m², k for fiberglass batt insulation is 0.037 W/mK, and the R-46 insulation is 12.5 inches (0.3175m) thick. Assuming the coldest average low temperature is -20C and the indoor temp a comfortable 20C, heat loss through the ceiling alone is 233W. Similarly, the north and south walls are 32.6m² in area each and insulated with R-20 (0.14m thick) for a heat loss of 344W each. Front and back walls are 13.5m² each for 142W each.
A simple estimate of the heating required is 233+(2*344)*(2*142) = 1438W and so a minimum of 5000BTU is required.
This simple estimate neglects heat loss through the doors and window though. The windows have a U factor of 1.7 W/(m²K). Total window area is 1.39m² (main window) plus 1.2m² (side lites). Q for the windows = A•ΔT*U = 2.59*40*1.7 = 176W. Similarly the doors have an estimated U factor of 1.2. Total area of the two side doors plus the main doors is 7.44m² and so the Q for the doors is 357W. The total heat loss is now estimated to be 1971W or 6700 BTU. At the absolute coldest conceivable low temperature of -30C (which hasn’t been encountered for over 140 years) a total of 8375 BTU would be required to maintain a cozy 20C inside.
All heat pumps have reduced output as temperature lowers. Test data directly from Senville shows that the 12000BTU unit actually outputs 9590 BTU at -20C outdoor/+20-C indoor conditions. This same unit can produce only 7340 BTU when the outside temp drops to a frigid -30C while the 9000 BTU version can produce only 5490 BTU so clearly the 12000 BTU version is the best size to handle the very coldest temps likely encountered in this area.
Efficiency? Under these conditions (-20C/+20C) it consumes 1.75kW while outputting 2810W for a (terrible) COP of 1.42 … and that’s about as bad as it will ever get in this area. The efficiency on a “normal” cold winter day (-8.3C outside) is considerably better with 13110BTU out (3842W) for an input of 1.92kW for a COP of 2.00. This improves, of course, as temperature increases.
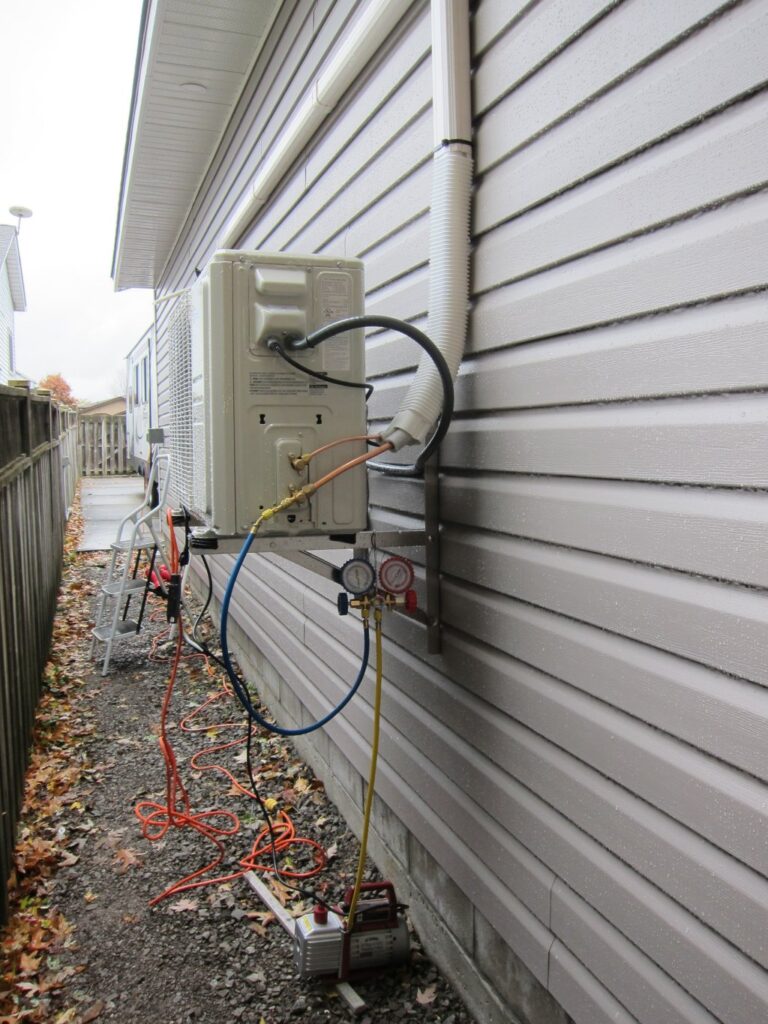
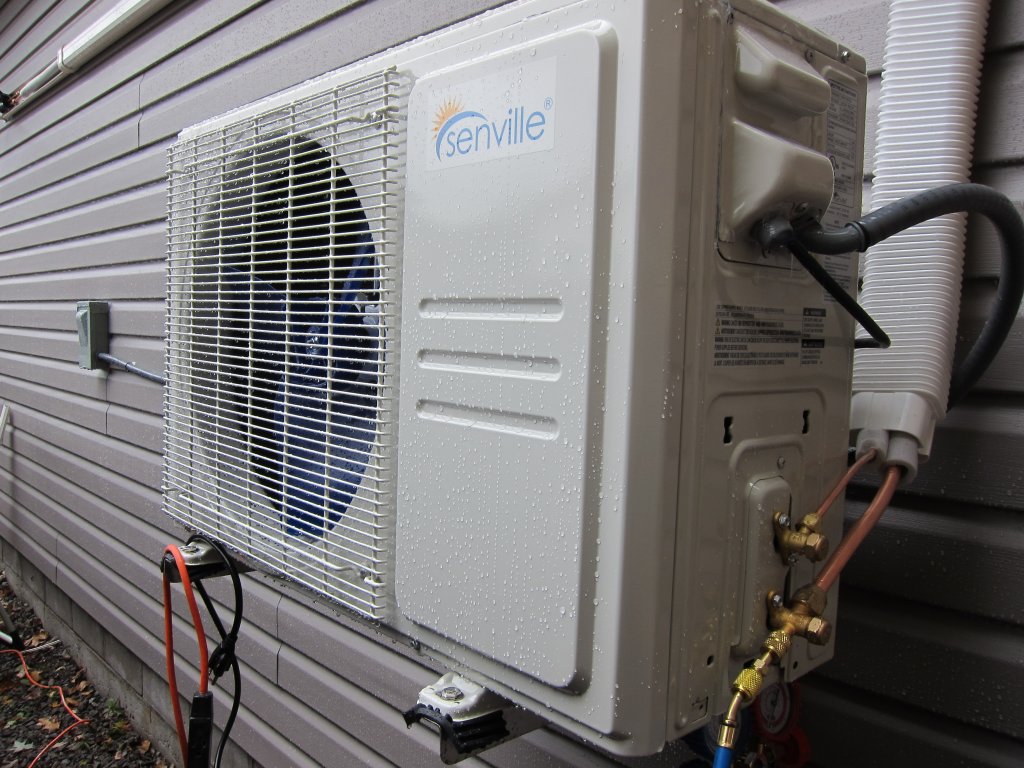
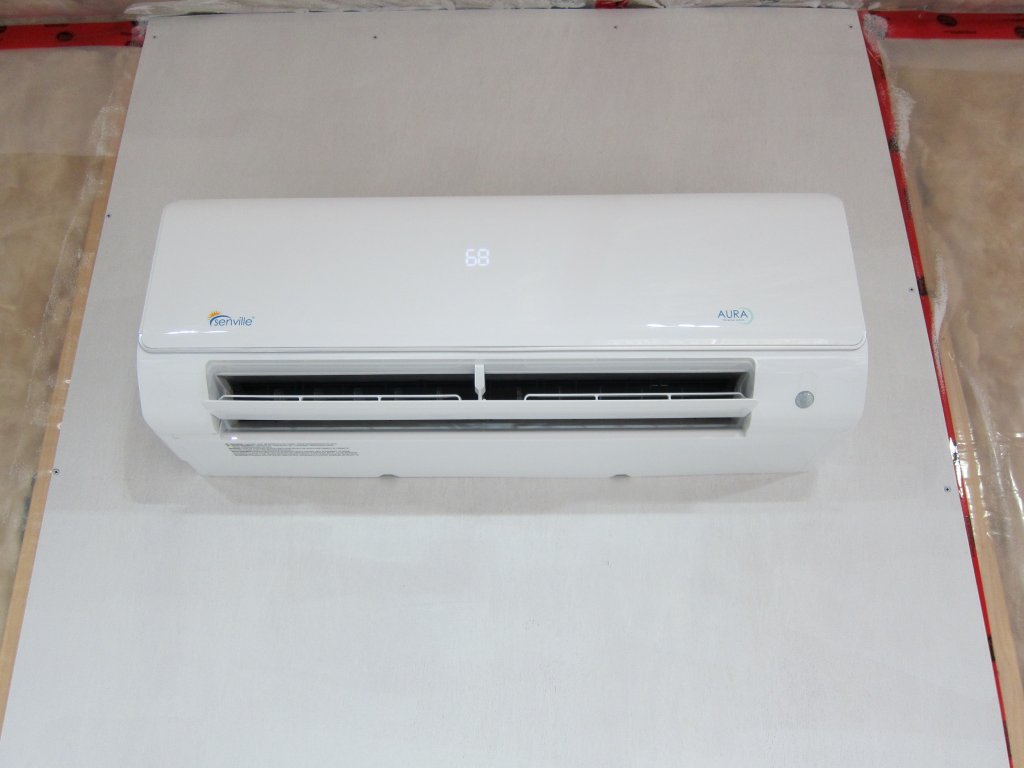
The unit chosen was a 12000-BTU Senville Aura unit with a 25.5 SEER rating and which operates down to -35C. This an ‘arctic’ unit rated for cold-weather service with a high COP of 3.88 (which decreases to 2.22 at -7C which is an average low for January and 1.42 at -20C which is about as cold as it ever gets in this area) – the company even sent me test data for the unit so I could properly estimate requirements. We already have a Senville 9000 BTU Aura unit in our bedroom, and installed a second unit at my daughter’s, so we are familiar with the installation and operation of it.
… and “just in case”, an inexpensive 4800W electric heater will be added to the shop (which certainly has the power for it). This heater has a purely mechanical thermostat which will be set to come on at 10C so in the unlikely event of heat pump failure or if more heat was required when, say, painting (and exhausting a sizeable flow of air).
Finishing The Interior
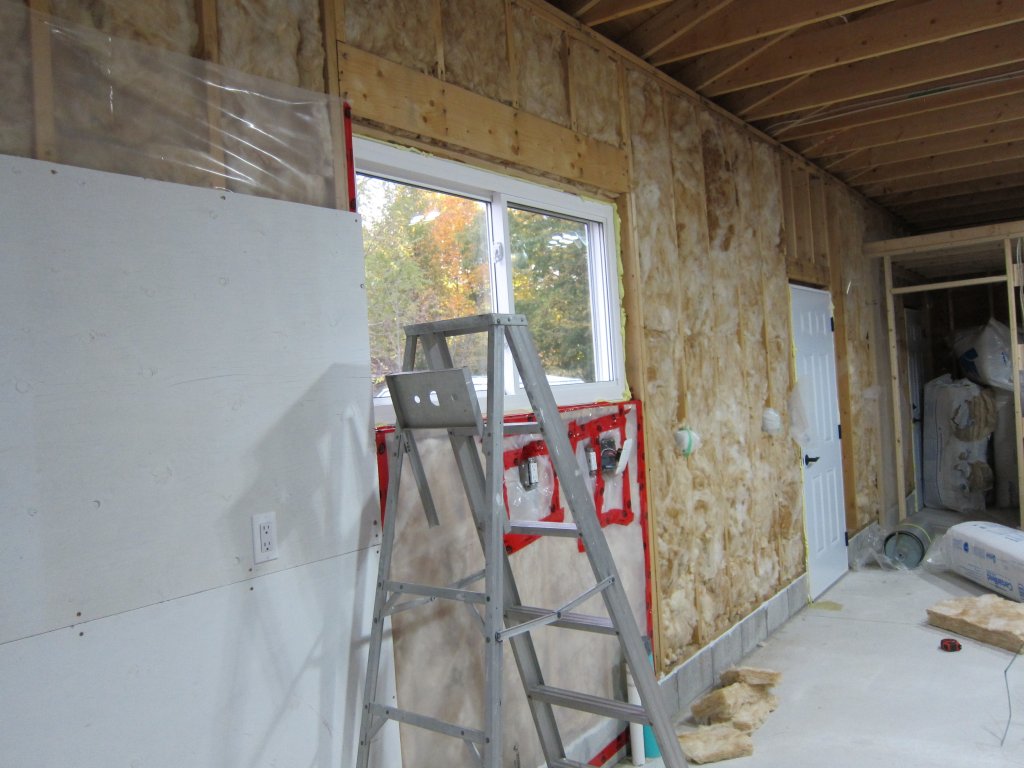
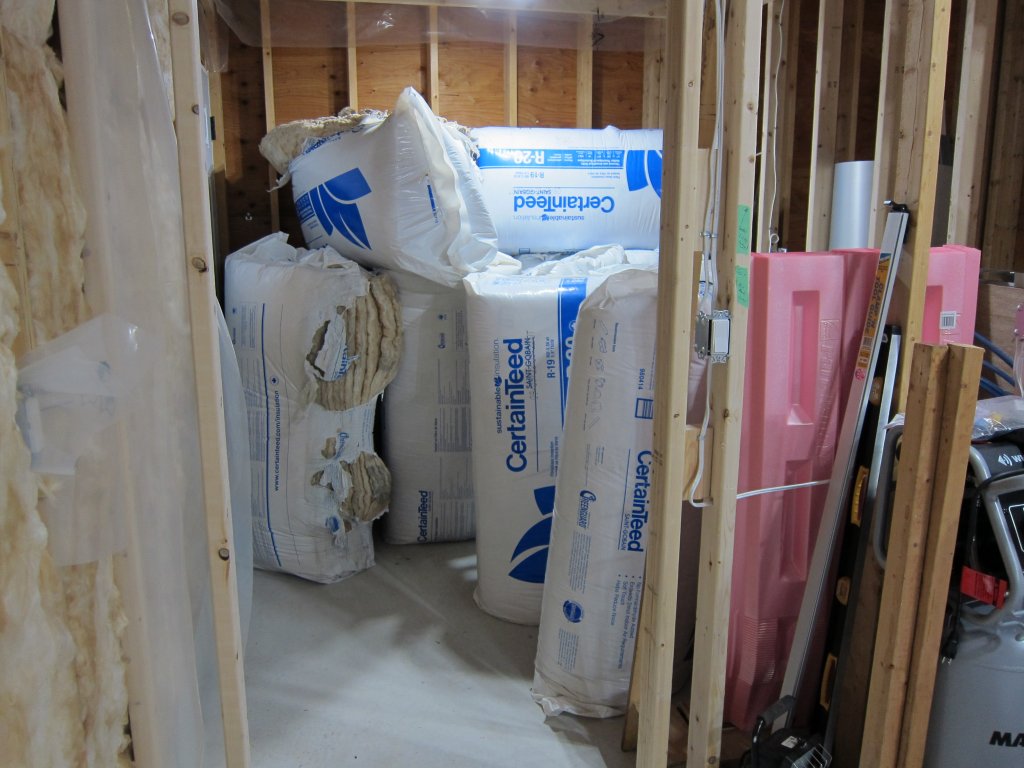
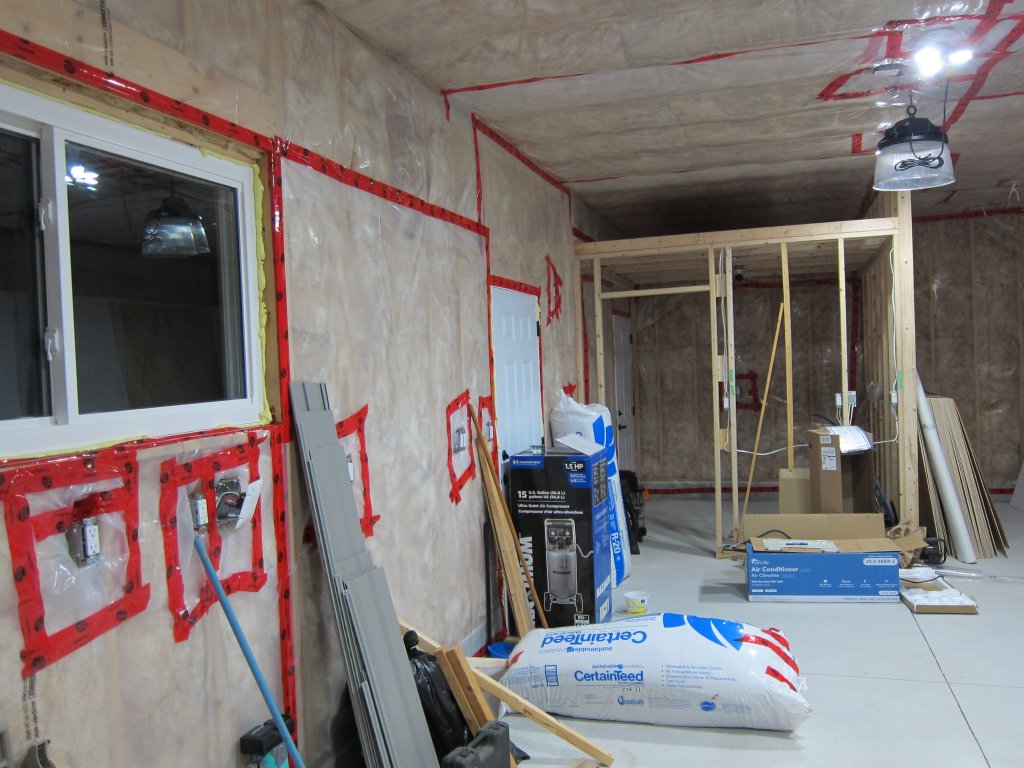
Since this is an all-season shop, it was insulated and heated. Insulation in the form of fiberglass batts was installed in the walls (R-20) and the ceiling (R-46) and vapour barrier added on the inside. Insulating the building was a slow process, much slower than anticipated, taking six days to complete. Insulating the walls was simple enough but the it took three full days to complete the ceiling which was insulated with a layer of R-20 then R-6 to build up level with the 2×8 wall ties and then a second R-20 layer perpendicular to that to ensure all cracks were covered well. Another full day was needed to cover the interior walls with 6-mil plastic vapour barrier (which includes taping all seams).
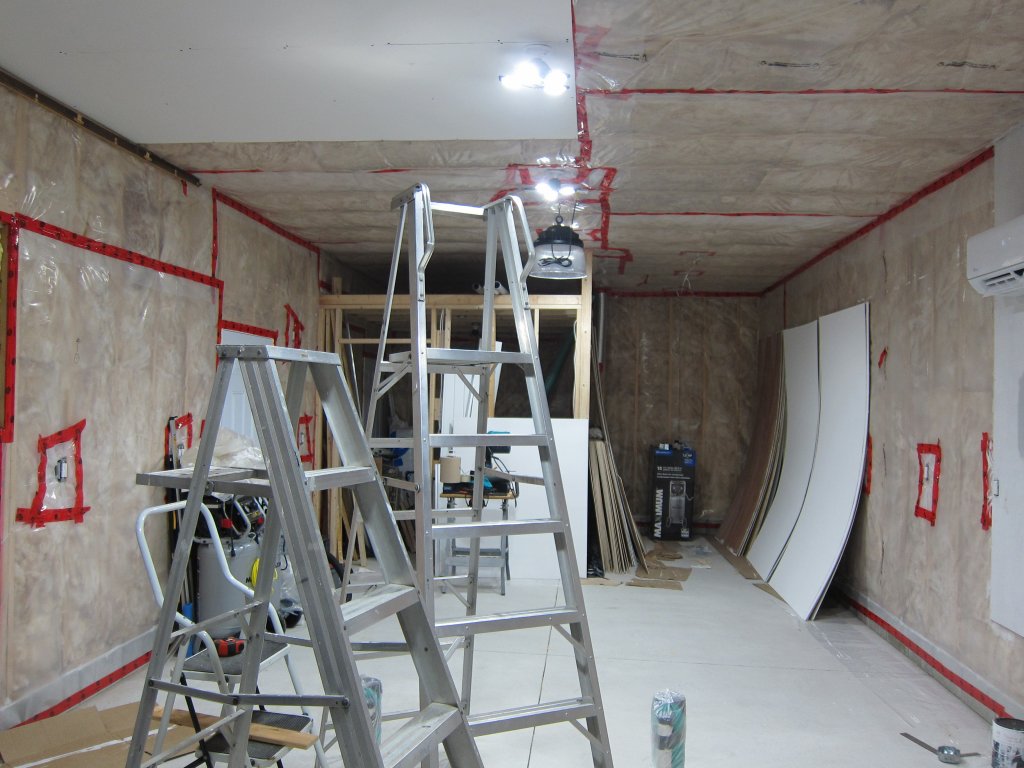
Walls and ceiling were to be clad with 5.5mm luaun plywood and painted: the initial plan was to use 7/16″ OSB which was quoted at $16 a sheet in the spring when the project began however by the fall when we were ready for walls the price had skyrocketed to $28 a sheet and as of October was $32 (as much as 3/8″ plywood)! Surprisingly, luaun did the opposite had fallen from $32 in the spring to $21 a sheet and since my wife hated the ‘rough’ look of OSB antyway, luaun it was … 64 sheets of it to cover the ceiling and walls. At first, only one sheet of luaun was installed on the walls for the inside unit of the heat pump – this allows other sheets to be painted and to dry in a warmed environment as the weather was starting to get cool in later October – sheets were painted flat on the ground before being put up as I hate working above my head.
So the heat pump was installed before the wall and ceiling covering. A 15A/240V circuit with disconnect for the heat pump was installed when the shop was wired. The outside unit sits on two brackets off the side of the building almost four feet in the air (to stay above potential snow drifts) and the inside unit on the north wall about seven feet off the ground. Filters will be added later to the inside unit to eliminate sawdust from clogging the fins. The pump unit comes pre-charged with R-410 however a vacuum pump is required to evacuate lines before refrigerant release. One day to install and a morning to pump-down and charge the system and we had heat before it started to get really cold in November.
Sheets were then primed and painted before being put up. Given the area of the shop, a maximum of a dozen sheets could be painted in one session before needing to be left to dry. Ceiling panels (21 of them) got one coat of primer and two coats of white ceiling paint, wall panels got similar treatment however with two coats of durable/scrubable paint. Panels were marked for electrical boxes and openings cut with a multi-tool saw before being installed. Panels were held up with 1-1/4″ drywall screws both to avoid hitting wiring and to allow removal in the event of misalignment during installation or later if needed for some type of retrofit. Installation of the pre-painted ceiling panels took two and a half days (most of it fitting the panels to minimize the gaps between them).
Building Complete!
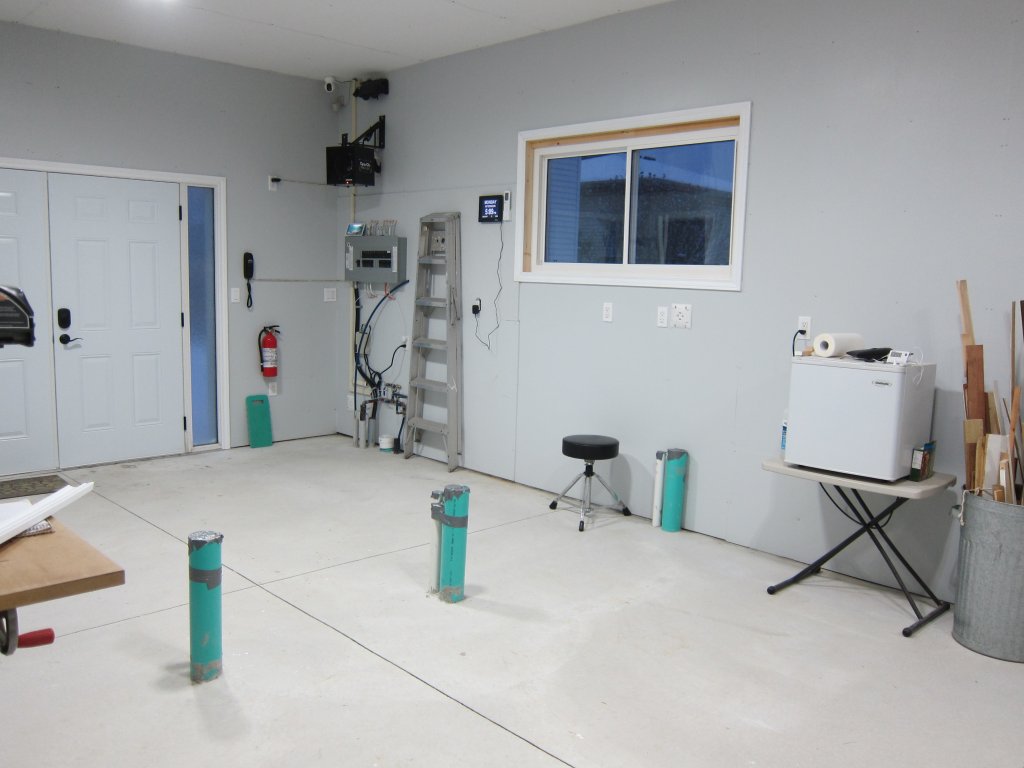
By January of 2024, less than ten months after starting, the shop building was complete: walls and ceiling were insulated and covered, heat was on, and some tools from the basement workshop were already migrating to their new home.
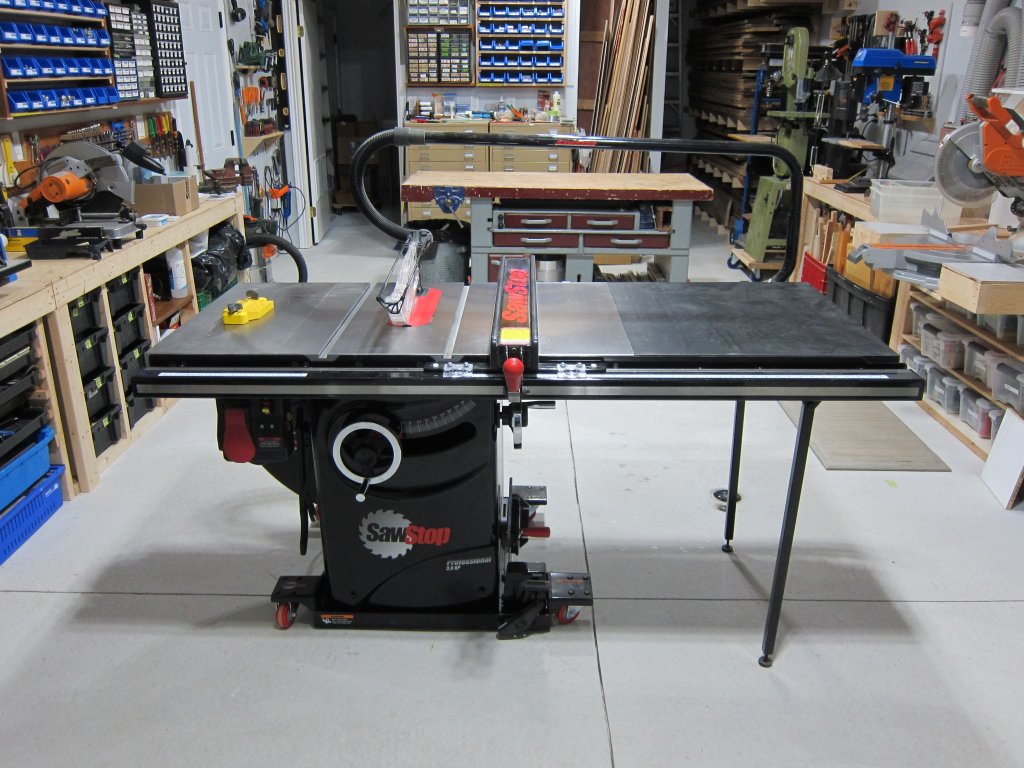
With the shop complete the fun begins: populating it with tools, and building workbenches. Some large tools from the basement workshop migrated here (including my 2hp dust collector and large floor-mounted drill press) and some new tools were be purchased (including the centerpiece of the shop, a SawStop 3hp cabinet saw with an excellent fence). Workbenches were built around the outside of the main area for tools .
Also added was the requisite sound system: a 4.1 four-speaker system (with subwoofer) linked to a Google Nest Hub via Bluetooth. 600 square feet requires a decent amount of sound power (and tunes are required for a shop).
P.S. The heat pump worked quite well during the brutal winter month of February which featured lows of -18C for several days in a row. The backup electrical heater was never required (but it was cheap insurance).
Tool, Tools, and More Tools!
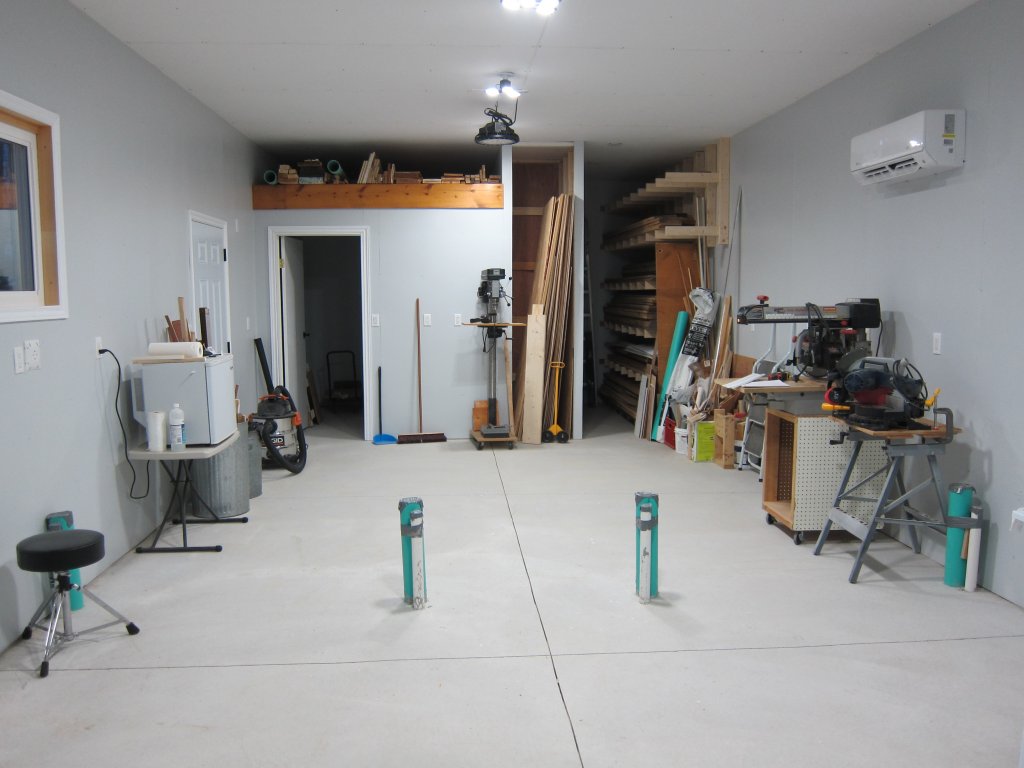
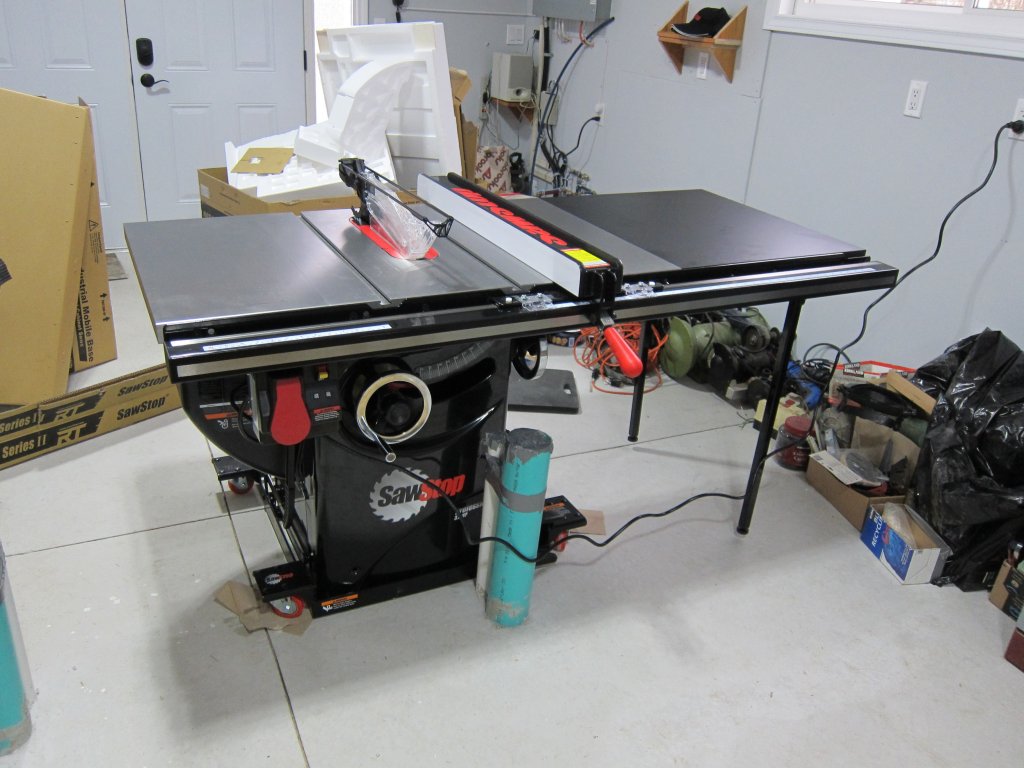
2024 was the year of populating the shop. The centerpiece of the shop is a 3hp SawStop cabinet saw. It sits on a hydraulic cart allowing it to be rolled around easily and turned sideways to cut long pieces. A 4″ duct buried under the concrete connects it to a 2hp duct collector at the back of the shop and a smaller duct allows the 240V power connection to be hidden as well – no tripping on cords and hoses. Also in the center of the shop, at the rear, is the main workbench customized for me with a 32″ height. Behind that sits two tool cabinets (low) and bins on the wall for common wood screws.
Around the sides of the shop are several workbenches as well as storage under the benches and on the walls.
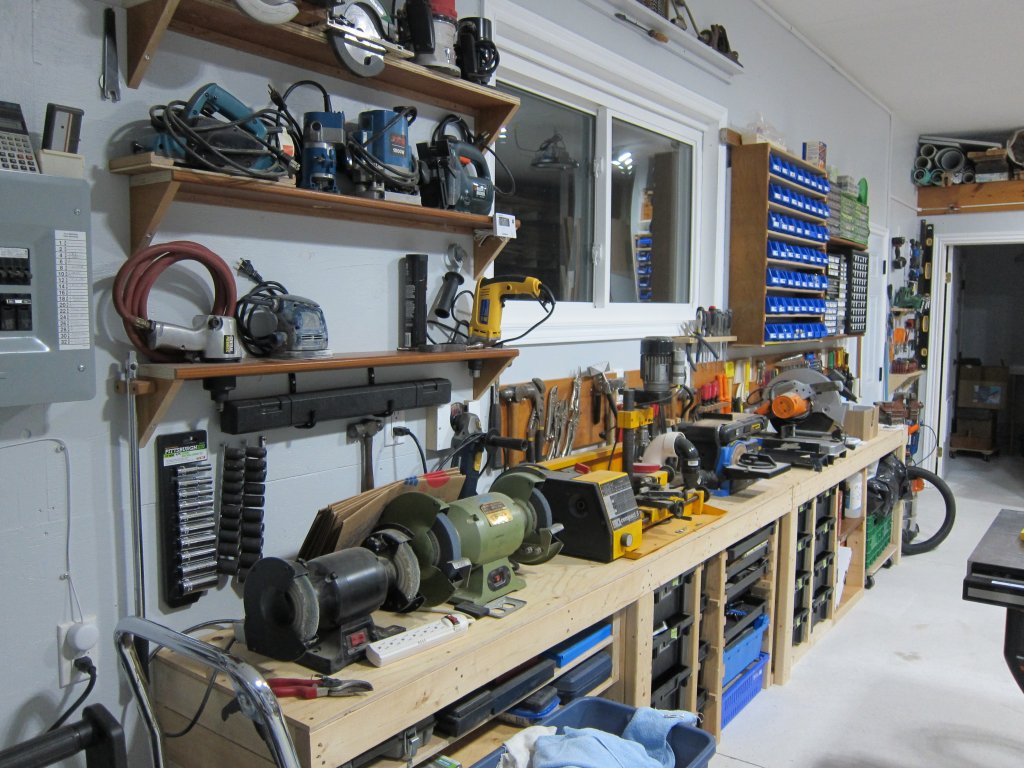
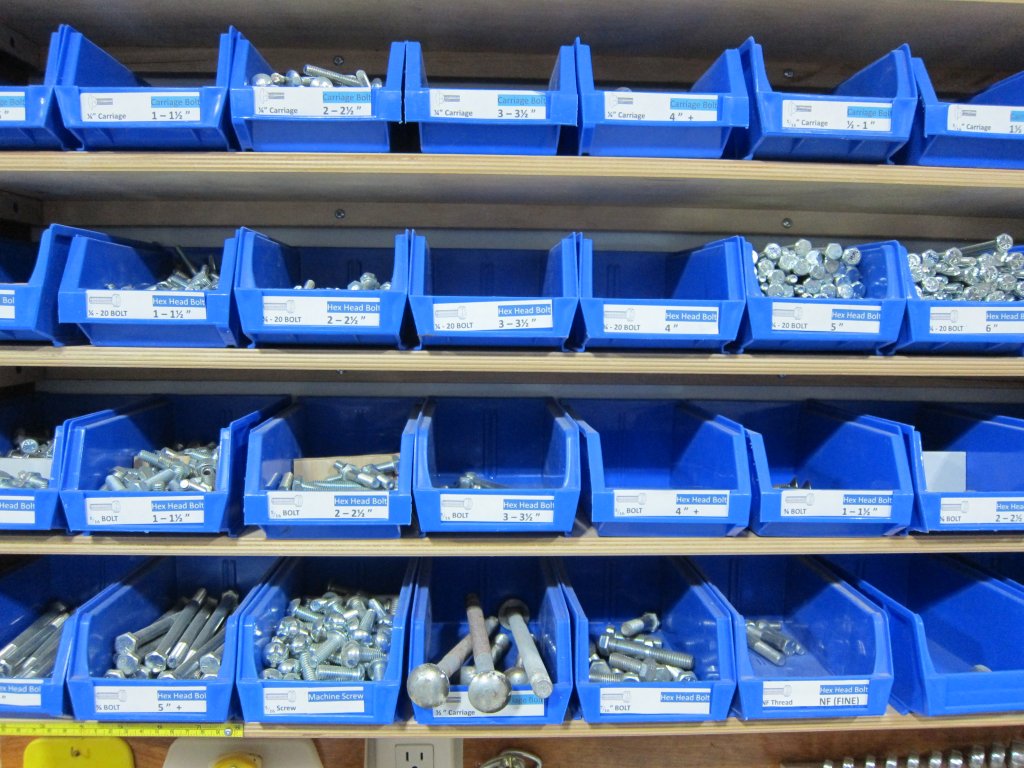
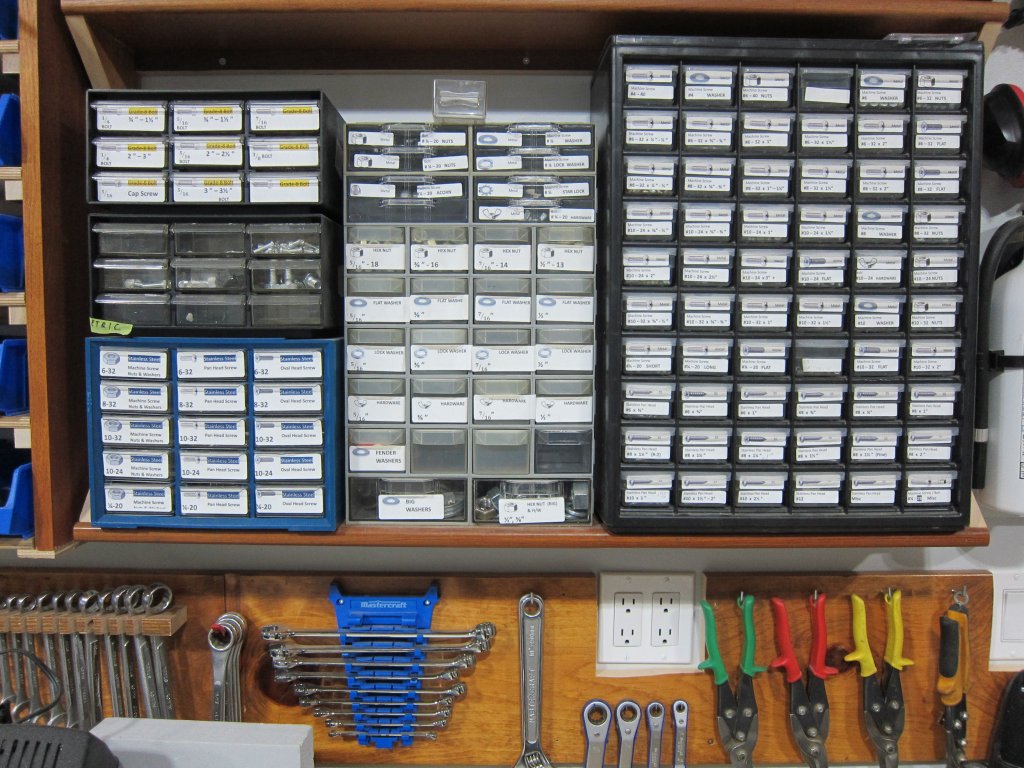
The south wall features a narrow (18″ wide) workbench for some small tools such as grinders, a small metal lathe, belt sander, and a vice. Many plastic drawers were installed under the workbench for storage of items from rags to tool jigs. Above the workbench (on the left side of the window) are narrow shelves for small power hand tools such as routers, saws, and drills. On the opposite side of the window a large number of plastic bins and drawers hold a selection of bolts and machine screws, all nicely sorted by size!
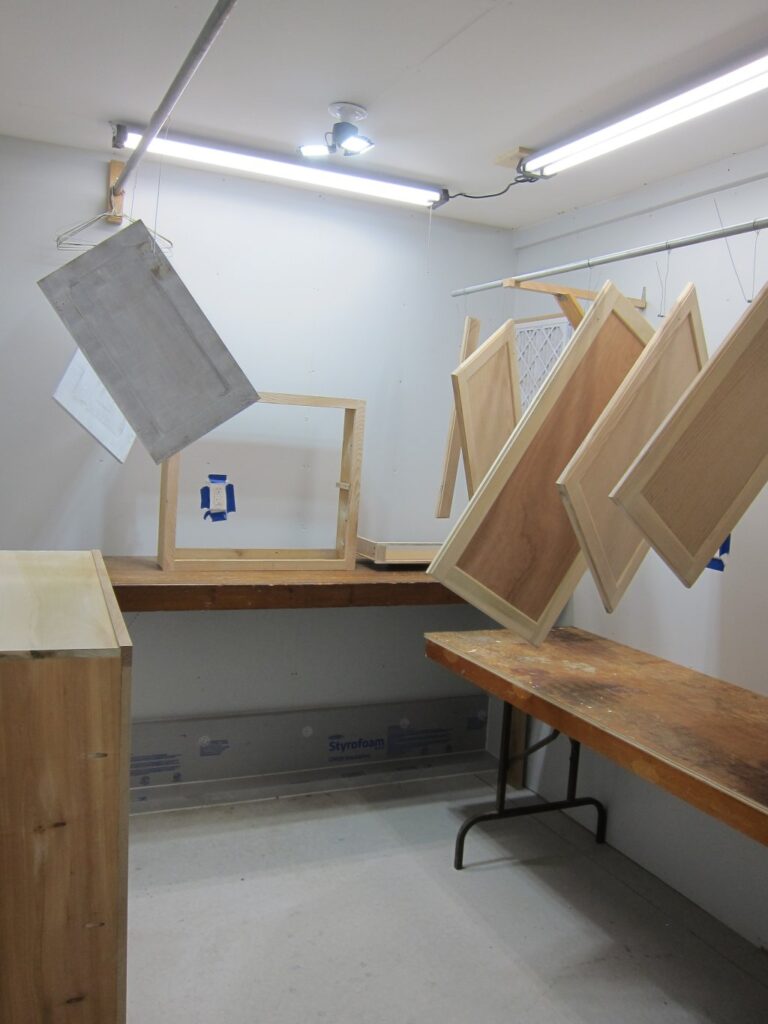
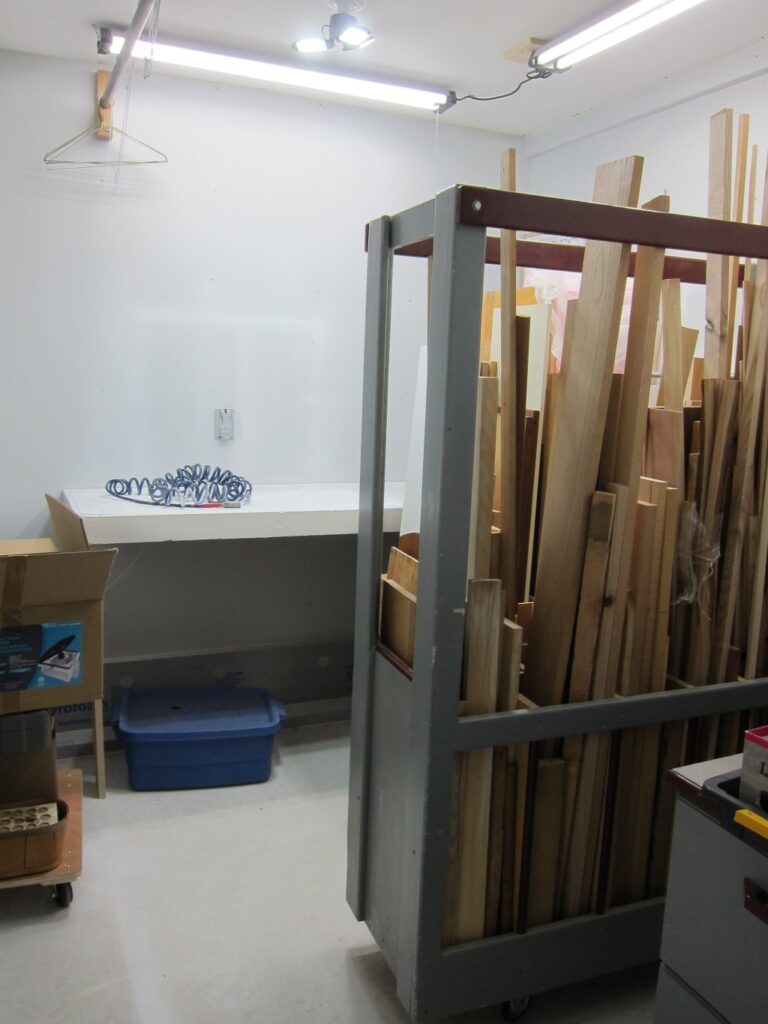
An 8′ x 9′ room at the rear of the shop serves as both a storage room (most of the time, with rolling carts to hold cuts of wood) and when required a paint room with a filtered air intake on the door and a 500 CFM exhaust fan to extract fumes.
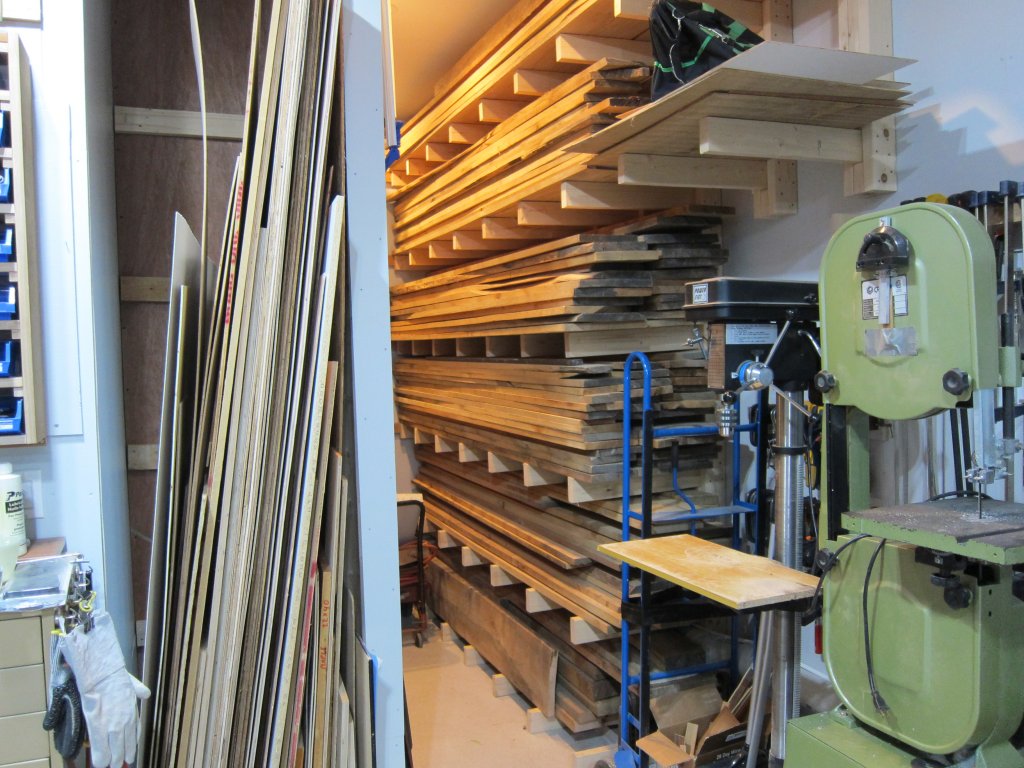
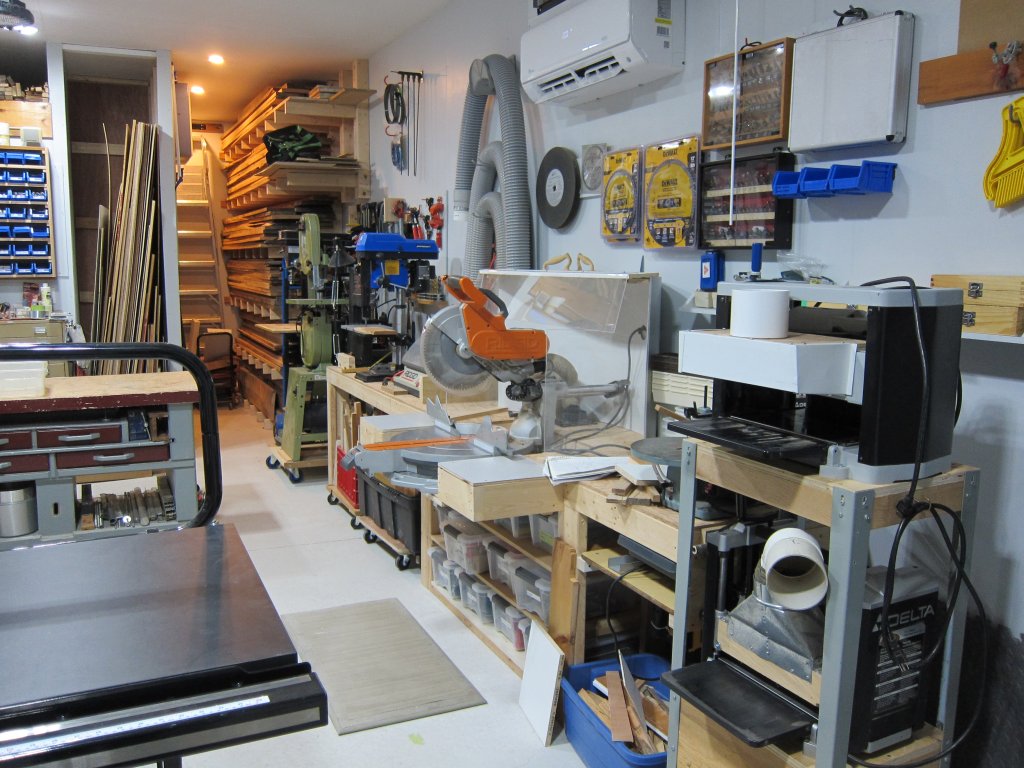
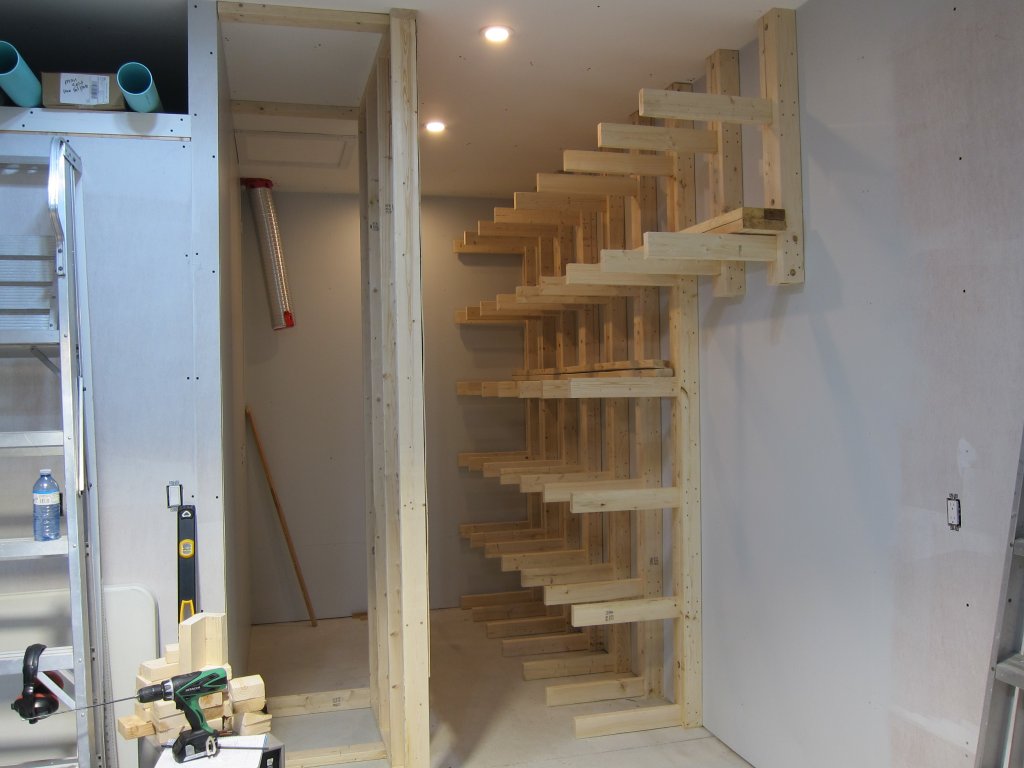
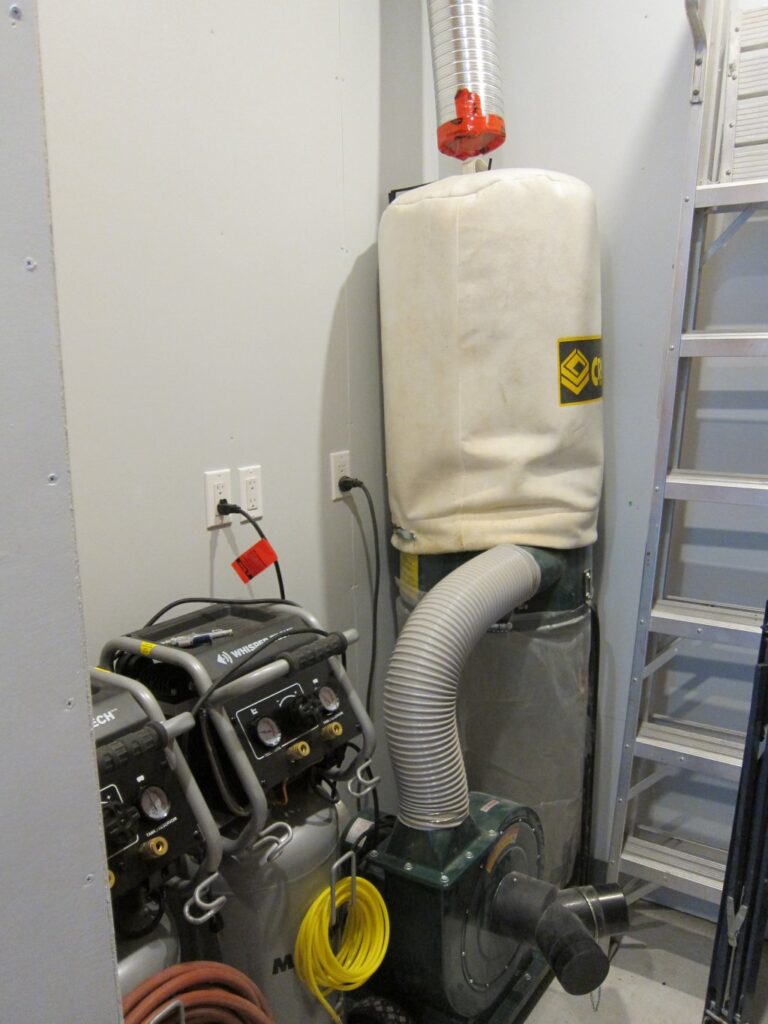
Beside the paint room (on the right), a 7′ x 9′ area holds the large wood storage rack (for a stock of rough pine, poplar, oak, and ash boards). Opposite the wood rack is a 2hp/240V dust collector, two air compressors (to supply the required volume of air for an HVLP spray gun), and an area for the storage of 4×8 sheet stock.
The north wall of the shop features a floor-standing drill press, large wood bandsaw, and another workbench (24″ in width) which houses a small drill press, a small metal bandsaw, an oscillating sander and a large sliding mitre saw. A large router (used as a shaper) mounts to the bench beside the mitre saw. As well, a rolling cart holds two thickness planers (both Deltas) and is rolled-out to the main area as required. Two planers means one is used for ‘roughing’ (and probably has chunks taken out of the knives) while the other is used for finish cuts (presumably with better knives). Major tools are ducted to the dust collection system which runs around the perimeter of the north wall about 18″ above the floor. Saw blades and drill bits are mounted on the wall below the heat pump.